Thingsboard is an open-source server-side platform that allows you to monitor and control IoT devices. It is free for both personal and commercial usage and you can deploy it anywhere. If this is your first experience with the platform we recommend to review what-is-thingsboard page and getting-started guide.
This sample application will allow you to control GPIO of your Raspberry Pi device using Thingsboard RPC widgets. We will observe GPIO control using Leds connected to the pins. The purpose of this application is to demonstrate Thingsboard RPC capabilities.
Raspberry Pi will use simple Android Things application that will connect to Thingsboard server via MQTT and listen to RPC commands. Current GPIO state and GPIO control widget is visualized using built-in customizable dashboard.
The video below demonstrates the final result of this tutorial.
Prerequisites
You will need to Thingsboard server up and running. Use either Live Demo or Installation Guide to install Thingsboard.
List of hardware and pinouts
-
Raspberry Pi - we will use Raspberry Pi 3 Model B but you can use any other model.
-
11 Leds with corresponding resistors
-
13 female-to-male jumper wires
Wiring schema
Since our application will allow to control state of all available GPIO pins, we recommend to attach some LEDs to those pins for visibility. You can use this basic instruction or another one to wire some LEDs. Below is sample wiring schema used in this tutorial.

Programming the Raspberry Pi
Flashing the Android Things image
First you need to flash Android Things image to your Raspberry Pi board using this guide. After finishing this guide make sure that your board has Internet access and accessible via adb tool.
Android Things development environment
Before starting with application introduced in this tutorial you need to prepare development environment to work with Android Things applications. Follow instructions from the official guide to build and deploy your first Android Things application.
Application source code
Now you should obtain source code of the GpioControlSample application from Thingsboard sanples GitHub repository. You can do this by issuing the following git clone command:
git clone https://github.com/thingsboard/samples
Open cloned samples folder and navigate to android-things/GpioControlSample.
Open GpioControlActivity.java file located at app/src/main/java/org/thingsboard/sample/gpiocontrol folder.
You will need to modify THINGSBOARD_HOST constant to match your Thingsboard server installation IP address or hostname. Use “demo.thingsboard.io” if you are using live demo server.
The value of ACCESS_TOKEN constant corresponds to sample Raspberry Pi device in pre-provisioned demo data. If you are using live demo server - get the access token for pre-provisioned “Raspberry Pi Demo Device”.
Running the application
Make sure that your Raspberry device is accessible via adb tool:
adb devices
Navigate to GpioControlSample application folder and deploy application to the device:
./gradlew assembleDebug
adb push ./app/build/outputs/apk/app-debug.apk /data/local/tmp/org.thingsboard.sample.gpiocontrol
adb shell pm install -r "/data/local/tmp/org.thingsboard.sample.gpiocontrol"
Or you can use other options to deploy Android application:
Finally you can start the application by issuing the following adb command:
adb shell am start -n "org.thingsboard.sample.gpiocontrol/org.thingsboard.sample.gpiocontrol.GpioControlActivity" -a android.intent.action.MAIN -c android.intent.category.LAUNCHER
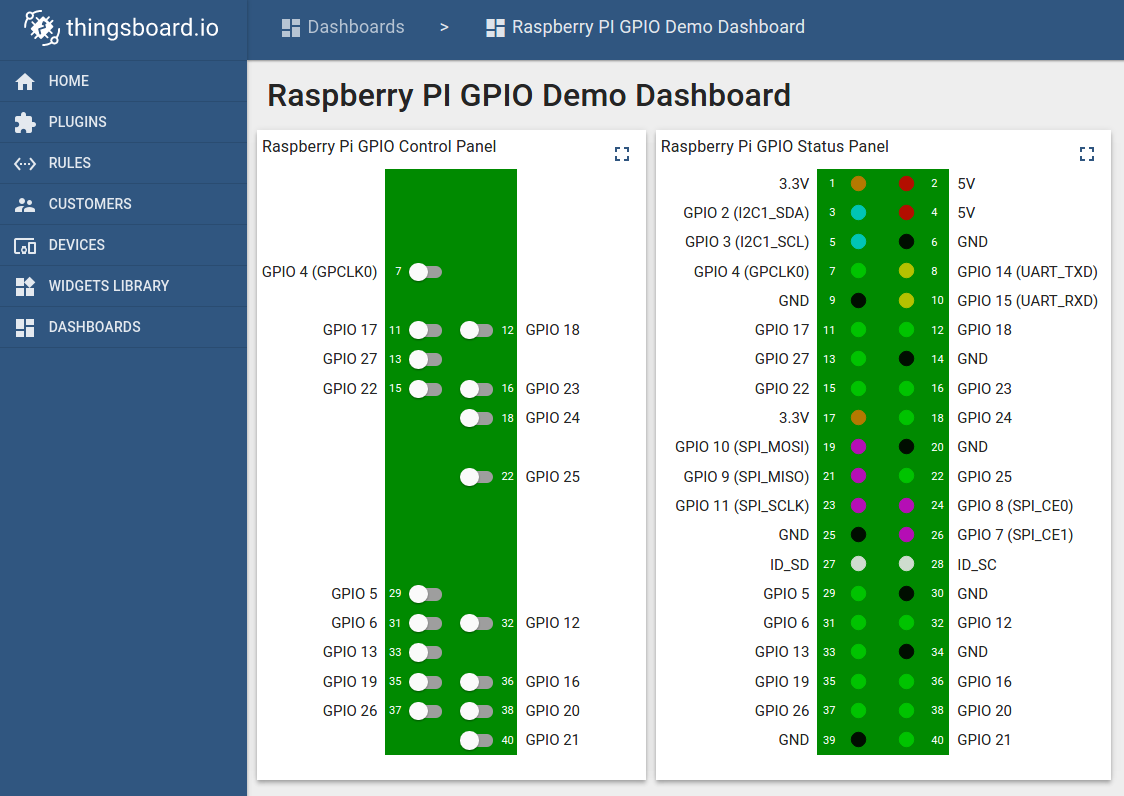
Data visualization
In order to simplify this guide we have included “Raspberry PI GPIO Demo Dashboard” to the demo data that is available in each thingboard installation. Of course, you can modify this dashboard: tune, add, delete widgets, etc. You can access this dashboard by logging in as a tenant administrator.
In case of local installation:
- login: [email protected]
- password: tenant
In case of live-demo server:
- login: your live-demo username (email)
- password: your live-demo password
See live-demo page for more details how to get your account.
Once logged in, open Dashboards->Raspberry PI GPIO Demo Dashboard page. You should observe demo dashboard with GPIO control and status panel for your device. Now you can switch status of GPIOs using control panel. As a result you will see LEDs status change on device and on the status panel.
Below is the screenshot of the “Raspberry PI GPIO Demo Dashboard”.
Next steps
Browse other samples or explore guides related to main Thingsboard features:
- Device attributes - how to use device attributes.
- Telemetry data collection - how to collect telemetry data.
- Using RPC capabilities - how to send commands to/from devices.
- Rule Engine - how to use rule engine to analyze data from devices.
- Data Visualization - how to visualize collected data.
Hey people! You can hire a subject professional from https://essaysrescue.com/paperrater-review/ for any type of work. Our writers specialize across all subjects and academic levels. Their profound expertise is the key to brilliant results and fast delivery. Any task is do-able with their pro help.
ReplyDeleteHello guys! I'd like to buy interview essay. I am assigned to write this type of essay but do not have a wide experience of passing interviews. I need assistance of a professional writer.
ReplyDeleteThis comment has been removed by the author.
ReplyDeleteI really enjoyed reading your thoughts on [theme] and your article was fantastic. You offered a fresh viewpoint that caused me to reconsider the matter.Birla Trimaya Team Appreciates you
ReplyDeleteI'm happy to be able to help people know about duck life game, you should play this amazing game.
ReplyDeletePrestige Lavender Fields Team enjoy what you guys are doing. Keep up the great work guys I've added you guys to my blogroll for your incredibly thoughtful writing and reporting. It, in my opinion, will raise the quality of my website.
ReplyDeleteGreat information, Keep Writing.
ReplyDeleteProvident Ecopolitan Price and
Casagrand Zaiden
Prestige Serenity Shores appreciate your support and look forward to providing you in the future with even more thought-provoking and exciting content.
ReplyDeleteInvesting in Birla Trimaya
ReplyDeleteShettigere not only provides an excellent living experience but also offers a promising investment opportunity in one of Bangalore's rapidly developing areas.
Prestige Park Grove is a heartfelt tribute to the beauty and power of familial ties.
ReplyDeleteThis blog article turns information into an engaging journey rather than only providing information. It's a pleasure to read and learn from you because of your distinctive writing style. Prestige Southern Star
ReplyDeleteAdarsh Welkin Park Hosa Road is the epitome of modern urban living, offering a luxurious lifestyle in the heart of the city.
ReplyDeleteThe team at Provident Deansgate will enjoy what you do. Keep up the good work. I have added you to my blog for your wonderful and thoughtful posts and reports. I think it will improve the quality of my site.
ReplyDeletePrestige Park Ridge was accepted your comment.
ReplyDeleteThanks for sharing from Sobha Neopolis
DeleteI wanted to take a moment to express my sincere appreciation for your remarkable blog - Provident Deansgate
ReplyDeletePrestige Kings County agree an support with your post.
ReplyDeleteProvident Ecopolitan start new apartment home
ReplyDeleteA comparative analysis showcasing how Sobha Neopolis Price stands out among other residential properties, emphasizing its distinctive features and advantages.
ReplyDeleteImagine if moving your stuff could be as smooth as controlling your Raspberry Pi – that would be pretty neat! So, just like making your gadgets work together, the idea of making local moving easier and more organized sounds pretty awesome too!
ReplyDeletePrestige Park Ridge is one of the flagship projects of Prestige Group near Bannerghatta Road, Bengaluru. Offering different housing options such as 1, 2 and 3 BHK flats, the project strives to offer best-in-class facilities to its residents.
ReplyDeleterep shoes are very popular among users, mainly because they are cheap and the quality is the same as the original products. Topreplicas mainly targets high-end, making high-quality rep shoes, such as: jordan 4 reps, nike reps, jordans reps, etc. If you want a cheap price and have high requirements for quality, this is undoubtedly the most suitable one for you.
ReplyDeleteElevate your ultimate style with jordans Reps shoes, topreplicas are just right for you. It has the same quality as the original at an unbeatable price.
ReplyDelete"""Natural predators can play a significant role in pest management.""" Pest Control Oakville
ReplyDeleteWhat a fabulous post this has been. Never seen this kind of useful post. Cat Needs Best
ReplyDeleteBrigade Citrine I found the writing style of this article to be engaging and captivating. It kept me hooked from start to finish
ReplyDeleteWhat a fabulous post this has been. never seen this kind of useful post
ReplyDeleteIn That Quiet Earth
What a fabulous post this has been. never seen this kind of useful post
ReplyDeleteShriram Serenity
Such a fabulous post never seen in life. Thanks for sharing a useful post Delhi to Ranikhet Bus
ReplyDeleteWhat a fabulous post this has been. never seen this kind of useful post
ReplyDeleteTotal Environment Jakkur
Abhee Eden Vista Premium 3 & 4 BHK Apartments on Sarjapur Road, Bangalore
ReplyDeleteAbhee Eden Vista is a luxurious residential project located on Sarjapur Road, Bangalore. It offers meticulously designed 3 & 4 BHK apartments with spacious layouts and high-quality finishes. The project boasts world-class amenities such as a swimming pool, fitness center, children's play area, landscaped gardens, and a clubhouse. Strategically situated, it provides excellent connectivity to major IT hubs, reputed schools, healthcare facilities, and shopping centers. Abhee Eden Vista is the perfect blend of modern living and convenience, making it an ideal choice for families seeking a sophisticated and comfortable lifestyle.
Explore Premium Living Modern Spaaces Apartments for Sale in Bangalore
ReplyDeleteSoulace by Modern Spaaces
Experience the perfect blend of luxury and tranquility at Soulace by Modern Spaaces Located on Sarjapur Road, this project offers spacious, well-designed apartments with top-notch amenities including a gym, swimming pool, and landscaped gardens.
Engrace Vista by Modern Spaaces
Engrace Vista by Modern Spaaces offers contemporary living spaces designed for comfort and style. Situated in a prime location, it features modern amenities like a clubhouse, fitness center, and children's play area, ensuring a vibrant community life.
Modern Spaaces Sarjapur Road
Modern Spaaces on Sarjapur Road presents a variety of residential options tailored to meet the needs of modern urban dwellers. Enjoy premium amenities, excellent connectivity, and proximity to major commercial hubs and educational institutions.
Engrace by Modern Spaaces
Engrace by Modern Spaaces is designed to provide a luxurious and comfortable living experience. With spacious apartments, high-quality finishes, and a range of amenities including a swimming pool and fitness center, it’s the ideal home for discerning buyers.
Modern Spaaces Plots in Sarjapur
Invest in your dream home with Modern Spaaces Plots in Sarjapur Offering well-planned plots in a rapidly developing area, this project provides the perfect opportunity to build a custom home with easy access to all essential amenities.
Modern Spaaces Serene Heights
Modern Spaaces Serene Heights combines elegance with functionality, offering beautifully designed apartments in a serene setting. With premium amenities such as a gym, swimming pool, and landscaped gardens, it’s the perfect place to call home.
TATA ONE Apartments in Devanahalli, North Bangalore, offer a luxurious living experience with modern amenities, sustainable features, and excellent connectivity. Strategically located near Kempegowda International Airport, these apartments provide easy access to major highways, educational institutions, and tech parks, making them an ideal choice for professionals and families alike. Embrace comfort, convenience, and community living at TATA ONE Apartments.
ReplyDeleteAt Brigade Sanctuary
ReplyDelete, we believe in creating more than just homes; we build communities where residents thrive. If you’re ready to elevate your living experience and find your sanctuary, we invite you to explore our offerings. Visit our website or contact us today to schedule a tour and discover why Brigade Sanctuary is the perfect place to call home.
Brigade Insignia is an exclusive residential project by Brigade Enterprises Limited, located in one of Bangalore’s prime areas. This development offers a sophisticated and luxurious living experience, designed to meet the needs of discerning homeowners who value elegance, comfort, and convenience.The project features a range of meticulously designed apartments, including 2 BHK and 3 BHK units, each with spacious layouts and high-quality finishes. These residences are equipped with modern amenities, contemporary interiors, and large windows that provide ample natural light and stunning views of the surrounding cityscape.
ReplyDeleteBrigade Orchard Devanahalli is a pioneering integrated township located in Devanahalli, Bangalore, designed to offer a comprehensive and luxurious living experience. Spanning 135 acres, this master-planned community seamlessly blends residential, commercial, and recreational spaces, creating a vibrant and self-sustained environment. The residential options at Brigade Orchards are diverse, catering to various preferences and lifestyles. The township offers premium apartments, luxurious villas, and specialized senior living residences. Each home is thoughtfully designed with contemporary architecture, high-quality finishes, and modern amenities to ensure maximum comfort and convenience for its residents.
ReplyDeleteThe Brigade Insignia New project are more than mere emblems; they represent the rich history, valor, and dedication of the city’s military units. By understanding and appreciating these insignia, we honor the soldiers who have served and continue to serve with distinction. As Bangalore continues to grow and evolve, these insignia remain enduring symbols of the city’s proud military heritage.
ReplyDeleteBrigade Sanctuary, we believe in creating more than just homes; we build communities where residents thrive. If you’re ready to elevate your living experience and find your sanctuary, we invite you to explore our offerings. Visit our website or contact us today to schedule a tour and discover why Brigade Sanctuary is the perfect place to call home.
ReplyDeleteBrigade Orchards is a pioneering integrated township located in Devanahalli, Bangalore, designed to offer a comprehensive and luxurious living experience. Spanning 135 acres, this master-planned community seamlessly blends residential, commercial, and recreational spaces, creating a vibrant and self-sustained environment.
ReplyDeleteNikoo Home 6 features a variety of living spaces, from cozy studios to spacious 4-bedroom apartments. Each home is designed to maximize natural light and ventilation, offering a healthy and comfortable living environment. High-quality materials and elegant finishes add a touch of sophistication to every residence.
ReplyDeleteThe great content in this site good article also thanks for information
ReplyDeleteGodrej Park Retreat
ReplyDeleteBrigade Sanctuary is a luxurious residential community in varthur road that offers a perfect blend of modern elegance and serene living. Designed with a variety of layouts to suit different lifestyles, the homes feature spacious interiors, premium finishes, and smart home technology.
The Brigade insiginia Yehlanka are much more than decorative symbols; they are enduring emblems of the city’s proud military heritage. By understanding and appreciating these insignia, we honor the soldiers who have served with distinction and continue to uphold the values of duty, honor, and sacrifice. As Bangalore continues to grow and evolve, these insignia will remain as lasting reminders of the city’s rich military history and the brave men and women who have contributed to it.
ReplyDeleteBrigade Orchard Devanahalli Bangalore is not just a place to live—it’s a lifestyle that combines luxury, sustainability, and a sense of community. Whether you’re looking for a spacious villa, a modern apartment, or a supportive environment for senior living, Brigade Orchards has something for everyone. If you’re searching for a home that aligns with your values and offers the best of modern living, Brigade Orchards is the perfect choice.
ReplyDeleteNikoo Home 6 in Bhartiya City, Bangalore, offers a luxurious and convenient urban living experience with a range of modern apartments, from studios to 4-bedroom units. The development features top-tier amenities, including a state-of-the-art clubhouse, green spaces, sports facilities, and children’s play areas, fostering an active and social lifestyle. With a strong emphasis on sustainability through eco-friendly practices, enhanced security measures, and a prime location with excellent connectivity to IT hubs, schools, and healthcare, Nikoo Home 6 is an ideal choice for homebuyers and investors seeking a thriving community and a smart investment opportunity.
ReplyDeleteNikoo Home 6 is a premier luxury residential project situated on Kogilu Main Road, Maruthi Nagar, Bangalore. This development offers an array of residences, including 2, 3, and 4 BHK apartments, as well as loft duplex homes, catering to diverse lifestyle needs.
ReplyDeleteThe Brigade Insignia of Bangalore are more than just symbols; they are emblems of the city’s proud military heritage. By understanding and appreciating these insignia, we honor the soldiers who have served with distinction and continue to uphold the values of duty, honor, and sacrifice. As Bangalore continues to grow and evolve, these insignia will remain as lasting reminders of the city’s rich military history and the brave men and women who have contributed to it.
ReplyDeleteEnsemble Apartments at Muthanallur Cross stands out as a beacon of luxury, comfort, and modern living. Offering a range of 2, 3, and 4 BHK flats starting at 1.26 Cr* onwards, This Flats is the epitome of sophisticated urban living. Let's delve into what makes this project a sought-after choice for homebuyers.
ReplyDeleteOne of the most compelling reasons to consider this Apartments is its strategic location at Muthanallur Cross, a burgeoning area in South-East Bangalore. Muthanallur Cross is situated along the Sarjapur-Attibele Road, an area that has gained prominence due to its proximity to major IT hubs like Electronic City, Whitefield, and the Outer Ring Road. This ensures that residents of This Apartments enjoy seamless connectivity to their workplaces, significantly reducing daily commute times and enhancing their quality of life.
Nambiar Bellezea Located strategically in the heart of Bangalore, offers a unique blend of contemporary architecture, top-notch amenities, and a serene environment, making it the ideal choice for discerning homebuyers.
ReplyDeleteThis Projects is strategically situated in the prime area of Sarjapur Road, one of Bangalore’s most sought-after locales. This location offers excellent connectivity to major IT hubs like Electronic City, Whitefield, and Marathahalli, making it a perfect choice for professionals. The proximity to reputed educational institutions, healthcare facilities, shopping centers, and entertainment hubs adds to its allure. Residents can enjoy the convenience of urban living while being nestled in a tranquil environment.
Brigade Sanctuary, one-of-a-kind living experience blends nature and nostalgia. Situated on Varthur Road in Bangalore, this stunning residential estate blends modern living with tranquility of nature.
ReplyDeletebrigade apartments bangalore offers 3 and 4 BHK houses that are assured to be comfortable, functional, and aesthetically pleasing. Let’s now investigate the several factors that make Project a well-liked residential area in Bangalore.
ReplyDeleteLiving in brigade sanctuary bangalore
ReplyDeletecomplex creates a strong feeling of community, when neighbors are considered extended family members rather than just fellow tenants.
At the apartment brigade apartments bangalore, ensuring the occupants’ safety and security is of utmost significance. The project offers inhabitants a safe and secure living environment with round-the-clock security staff, CCTV surveillance, and a strong access control system.
ReplyDeleteTo control Raspberry Pi GPIO pins using an Android device, follow these steps are Install Raspbian OS, Update and upgrade, Enable SSH, and Install necessary packages. Set up a server on the Raspberry Pi using Flask, a lightweight web framework for Python. Create an Android app or use a web browser to interact with the Flask server. Test the setup by sending requests from your Android device and observing changes on the GPIO pins Domestic Violence Registry New Jersey.
ReplyDeleteHello
ReplyDeleteI appreciate the introduction. Using Thingsboard with a Raspberry Pi seems like an excellent way to investigate its RPC features, and it sounds like a strong tool for controlling IoT devices. excited to watch the video and give the GPIO control demo a try!
Regards
Ava Daisy
Prestige Palm Court
At Godrej Projects
ReplyDelete, we blend our 125-year legacy of excellence and innovation with cutting-edge design and sustainability. Our latest project, Godrej lakeside orchard, is a premium residential development that offers luxurious living amidst tranquil greenery in Bangalore's thriving Sarjapur Road area.
Godrej Lakeside Orchard is a residential development situated in Mumbai, designed to blend modern living with nature. The project features contemporary apartments surrounded by lush greenery, gardens, and water bodies. Residents can enjoy a range of amenities, including a clubhouse, swimming pool, gym, and recreational spaces.
ReplyDeleteGodrej Park Retreat, also located in Bangalore, offers a serene living experience with a focus on green spaces and community living. The project includes thoughtfully designed apartments with modern interiors and ample natural light.
Total Environment Down by the Water I love that this article not only informs but also calls readers to action. It’s empowering and gives practical steps for those who want to make a difference.
ReplyDeleteAbhee Eden Vista Luxurious Living Amidst Serenity Experience sophisticated 2 and 3 BHK apartments at Abhee Eden Vista, offering modern amenities and a tranquil environment, perfect for families seeking comfort and connectivity in Bangalore.
ReplyDeleteAbhee Celestial City A Blend of Elegance and Convenience Discover the thoughtfully designed residential units at Abhee Celestial City, where top-notch facilities and strategic location combine to create a perfect living experience.
Flats in Gunjur Modern Homes in a Prime Neighborhood Abhee Projects' offerings in Gunjur stand out for their modern designs, excellent infrastructure, and accessibility, making them an attractive choice for homebuyers looking for value and style.
Abhee Skyline Vista Elevated Urban Living With sleek architecture and premium amenities, Abhee Skyline Vista provides a luxurious lifestyle for urban dwellers in Bangalore who appreciate comfort and sophistication.
Your blogs are really good and interesting. It is very great and informative. If you found this article interesting, please leave your feedback in the comments section, post questions or feature requests on the forum and “star” our project on the github in order to stay tuned for new releases and tutorials bankruptsy lawyers near me. I got a lots of useful information in your blog. Keeps sharing more useful blogs..
ReplyDeleteHello
ReplyDeleteGreat information and useful blog,
Regards
Nisha Marshall
Prestige Evergreen
Discover the elegance of
ReplyDeleteSobha ayana
, offering 3 BHK apartments ranging from 1500 to 1800 sq.ft. in the heart of Panathur, Bangalore. Spacious designs and premium amenities ensure a lifestyle of comfort and sophistication.
Use an Android device to control the Raspberry Pi's GPIO pins by following these steps: Install the Raspbian operating system. Install the required packages, enable SSH, and update and upgrade. Configure a Raspberry Pi server with Flask, a Python web framework that is lightweight. Use a web browser or develop an Android app to communicate with the Flask server. Sending queries from your Android device and monitoring changes on the GPIO pins will allow you to test the arrangement.virginia reckless driving
ReplyDeleteGreat tutorial! The step-by-step approach makes it easy to follow, and I appreciate the detailed explanation of how ThingsBoard integrates with Raspberry Pi for GPIO control. This opens up so many possibilities for IoT projects! Do you have any recommendations for optimizing performance when handling multiple GPIO inputs/outputs simultaneously? Can Acupuncture Be Dangerous?
ReplyDeleteGreat Post Keep Sharing
ReplyDeleteAssetz Ren & Rei
Top Destination Wedding Hotels Great breakdown of what to consider when planning abroad. We always recommend couples start early and lean on experienced planners—especially for logistics across borders!
ReplyDeleteThe landmark success of Nambiar District 25 continues with its next phase — Nambiar Ensemble. This low-rise, high-luxury development stands as a unique offering in East Bangalore’s real estate scene. With Phase 2 comprising 800 homes across B + G + 6 floors, residents can look forward to vast green cover, robust infrastructure, and community-focused amenities in a setting that respects nature and promotes elevated living.
ReplyDeleteLooking for dependable truck services? Venus Truck Repair has you covered with expert Trailer Repair that keeps your rig rolling. We deliver fast, professional, and long-lasting solutions — trusted by truckers who can’t afford downtime. Visit us today and see the difference.
ReplyDeleteExactPrep provides the ideal platform to meet the demands of the constantly evolving SAP market. We are one of the world’s leading certification exam question and answer online training providers.
ReplyDeleteSAP courses
It looks like you've provided a description of a ThingsBoard application for controlling Raspberry Pi GPIOs, along with a mention of a video demonstration. However, there isn't a specific question asked.
ReplyDeletedog barks
Adarsh Welkin Park offers you 2.5 & 3 BHK Luxury and Spacious apartment. Located in Rayasandra, Hosa road, Off Sarjapur Road. Price starts from 1.85Cr Onwards. New Tower 4&6 launched. Grab your offer today. Visit site to experience the model house and construction quality.
ReplyDeleteVisit - https://adarshwelkinparks.in/
Call - +91 63645 90152
At Digi Kreatives, we create beautifully designed Cozy Coloring Books (Cozy Coloring Books), relaxing Printable coloring pages (Printable coloring pages), and inspiring Coloring Books (Coloring Books) for all ages.
ReplyDeleteExplore our Stress Relief Coloring Books (Stress Relief Coloring Books) to unwind your mind, enjoy Bold and Easy Coloring Books (Bold and Easy Coloring Books) for effortless creativity, and celebrate each moment with our charming Cozy Season Coloring Book (Cozy Season Coloring Book) — your perfect companion for mindfulness, art, and relaxation.
https://www.patreon.com/posts/experience-with-140930305?utm_medium=clipboard_copy&utm_source=copyLink&utm_campaign=postshare_creator&utm_content=join_link
ReplyDeleteThingsBoard is an open‑source IoT platform that lets you monitor and control devices, free for personal or commercial use. In this sample project, a Raspberry Pi connects to the ThingsBoard server via MQTT using a simple Android Things app. E-ZPass in West Virginia
ReplyDeleteSobha World City is an expansive, mixed-use township spanning approximately 48 acres in the rapidly developing East Bengaluru corridor, conceptualized and executed by the renowned Sobha Group. This project, which includes up to 18 high-rise towers soaring to around 54 floors, is designed to be a self-sustained world, integrating over 5,400 premium 2 & 3 BHK apartments with dedicated commercial and retail spaces. It promises residents a holistic lifestyle, combining the tranquility of vast open spaces and numerous amenities with the convenience of shops and offices within the community, all while benefiting from excellent connectivity to major IT hubs like Whitefield and future infrastructure such as the Satellite Town Ring Road (STRR).
ReplyDelete