Thingsboard is an open-source server-side platform that allows you to monitor and control IoT devices. It is free for both personal and commercial usage and you can deploy it anywhere. If this is your first experience with the platform we recommend to review what-is-thingsboard page and getting-started guide.
This sample application will allow you to control GPIO of your Raspberry Pi device using Thingsboard web UI. We will observe GPIO control using Led connected to one of the pins. The purpose of this application is to demonstrate Thingsboard RPC capabilities.
Raspberry Pi will use simple application written in Python that will connect to Thingsboard server via MQTT and listen to RPC commands. Current GPIO state and GPIO control widget is visualized using built-in customizable dashboard.
The video below demonstrates the final result of this tutorial.
Prerequisites
You will need to Thingsboard server up and running. Use either Live Demo or Installation Guide to install Thingsboard.
List of hardware and pinouts
-
Raspberry Pi - we will use Raspberry Pi 3 Model B but you can use any other model.
-
Led and corresponding resistor
-
2 female-to-male jumper wires
Wiring schema
Since our application will allow to control state of all available GPIO pins, we recommend to attach some LEDs to those pins for visibility. You can use this basic instruction or another one to wire some LEDs.
Programming the Raspberry Pi
MQTT library installation
Following command will install MQTT Python library:
sudo pip install paho-mqtt
Application source code
Our application consists of single python script that is well commented. You will need to modify THINGSBOARD_HOST constant to match your Thingsboard server installation IP address or hostname. Use “demo.thingsboard.io” if you are using live demo server.
The value of ACCESS_TOKEN constant corresponds to sample Raspberry Pi device in pre-provisioned demo data. If you are using live demo server - get the access token for pre-provisioned “Raspberry Pi Demo Device”.
resources/gpio.py |
|---|
|
Running the application
This simple command will launch the application:
python gpio.py
Data visualization
In order to simplify this guide we have included “Raspberry PI GPIO Demo Dashboard” to the demo data that is available in each thingboard installation. Of course, you can modify this dashboard: tune, add, delete widgets, etc. You can access this dashboard by logging in as a tenant administrator. Use
- login: [email protected]
- password: tenant
in case of local Thingsboard installation.
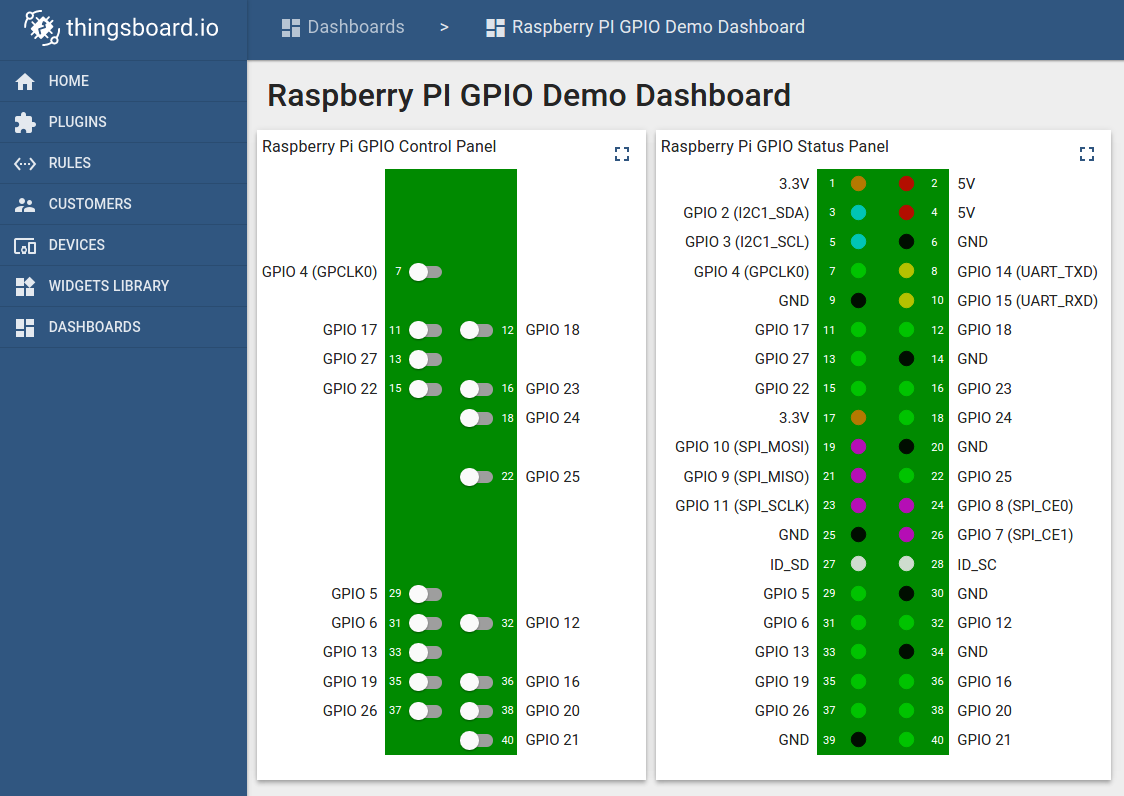
Once logged in, open Dashboards->Raspberry PI GPIO Demo Dashboard page. You should observe demo dashboard with GPIO control and status panel for your device. Now you can switch status of GPIOs using control panel. As a result you will see LEDs status change on device and on the status panel.
Below is the screenshot of the “Raspberry PI GPIO Demo Dashboard”.
Next steps
Browse other samples or explore guides related to main Thingsboard features:
- Device attributes - how to use device attributes.
- Telemetry data collection - how to collect telemetry data.
- Using RPC capabilities - how to send commands to/from devices.
- Rule Engine - how to use rule engine to analyze data from devices.
- Data Visualization - how to visualize collected data.
I used raspberry pi in my final semester project, this raspberry is amazing and remarkable, just like you i am also a blogger and i recently publish e commerce websites in pakistan blog you can also read this blogpost too.
ReplyDeleteI was struggling with paraphrasing my dissertation, and the paraphrasing service uk
ReplyDeleteteam was a lifesaver! They helped me to reword my work effectively without compromising the meaning or quality. The turnaround time was quick, and the final product was fantastic. I highly recommend this service to any student struggling with paraphrasing their work!
Thanks for share this information to us !!!
ReplyDeleteMyCCPay Log In
Thank you very much for the information; I will make an effort to learn more about it. Continue to propose posts like these and share posts that are as informative as they are. receiptify
ReplyDeleteI am extremely grateful for the information that you have provided; I will make an attempt to find out more about it. Maintain the practise of suggesting topics such as these and sharing posts that are equally as informative as these.
ReplyDeletecfa home
Sure, you can control Raspberry Pi GPIO via MQTT using Thingsboard. Explore features like automation and monitoring with Beetv APK for enhanced functionality.
ReplyDeleteI appreciate your message. We would be happy to help. So, please tell us briefly what the problem is that you're having. If you have any other questions, please let us know. krowd darden
ReplyDeleteThat is all the helpful information I needed. I appreciate you sharing.
ReplyDeleteVampire Survivors
The problem of video streams being split into little files when recording is discussed in "Recording Video Streams (Movies) are Split into Small Files." This sometimes happens when recording video streams like movies or TV shows with specific programmes or equipment.
ReplyDeleteThe recording programme or file format may impose restrictions that necessitate the video stream being split into multiple files. To make video streams more manageable or to circumvent problems with high file sizes, certain recording applications may split them into many files. It's possible that the file format being used necessitates the splitting of video streams into multiple files.
disney hub login
The ThingsBoard blog is a source for knowledge and analysis on the ThingsBoard open-source Internet of Things (IoT) platform. It provides IoT-related training, news, can police officer file protective order virginiaand debates to assist users get the most out of the platform for their IoT projects.
ReplyDeleteThis is a fantastic guide for setting up IoT device control using Thingsboard and a Raspberry Pi. The clear instructions and sample code make it accessible even for beginners. IoT enthusiasts will find this immensely helpful in their projects.
ReplyDeleteDivisión de el Activos Divorcio Nueva York
Casos de Divorcio en Nueva York
Everyone has something in their mind, so am I. ขาย ปลีก ส่ง บุหรี่ไฟฟ้า
ReplyDeleteOnline GRE test help Ethical considerations are a crucial aspect, and reputable services prioritize academic integrity.
ReplyDeleteA really great stuff! Keep it up. Dog likes best
ReplyDeleteThe purpose of the sample app is to connect Raspberry Pi GPIO to Thingsboard via MQTT for IoT control. Deploy and customize Thingsboard for tailored IoT solutions liteblue
ReplyDeletebandle offers a dynamic multiplayer experience where you can compete with friends or random opponents. This feature not only enhances the fun but also helps improve your word-forming abilities as you learn from others.
ReplyDeleteI love that they nail republic source their ingredients locally.
ReplyDeleteThe project demonstrates effective integration of Raspberry Pi GPIO control via MQTT using Thingsboard. It provides an intuitive and scalable solution for remote control of devices. However, the tutorial could benefit from more detailed troubleshooting steps and clearer explanations of MQTT message flow to assist beginners.
ReplyDeleteAbogado Violencia Doméstica Nueva Jersey Cherry Hill
Winners and losers often emerge based on preparation and effort, especially during festive seasons. For instance, those who embrace trends like the Christmas Emily Tosta jacket may win in making memorable holiday fashion statements. Similarly, winners seize opportunities, while losers miss out by neglecting details that bring festive joy and success.
ReplyDeleteThe tragic fire at St. Demiana's Church highlights the importance of preserving sacred spaces. Similarly, in the digital age, an Online Quran Academy serves as a crucial tool for preserving and spreading Islamic teachings worldwide. Both reflect the need to safeguard spiritual heritage through modern means.
ReplyDeleteExperimenting with fashion can be exciting, especially when it comes to timeless pieces like womens full-length leather coats These versatile garments allow you to explore bold, elegant styles while staying warm and chic. Whether pairing them with modern or vintage accessories, experimenting with textures and layers creates endless opportunities for unique, head-turning looks.
ReplyDeleteParvati lord shiva - This was such a fantastic read! Your insights are well-explained and truly valuable."
ReplyDeleteEdgy, stylish, and effortlessly cool, these jackets capture Jesse Pinkman’s iconic streetwear vibe. A must-have for fans of Jesse Pinkman jackets .
ReplyDeleteLooking for dependable truck services? Venus Truck Repair has you covered with expert Trailer Repair that keeps your rig rolling. We deliver fast, professional, and long-lasting solutions — trusted by truckers who can’t afford downtime. Visit us today and see the difference.
ReplyDeleteCrazy Cattle 3D is more than a game—it’s a woolly revolution in battle royale gaming.
ReplyDeleteProbé una calculadora inteligente de sueño que tiene en cuenta los ciclos REM y me mostró a qué hora debería dormirme dependiendo de mi hora de alarma, y ha sido un cambio radical en mi productividad.
ReplyDeleteThis article provides a clear and concise guide for controlling a Raspberry Pi's GPIO pins remotely using the Thingsboard platform and the MQTT protocol. It's a well-structured tutorial that walks you through the necessary hardware, code, and configuration steps, making it an excellent E-ZPass MA resource for anyone looking to get started with IoT device control and Thingsboard's RPC capabilities. The inclusion of a pre-configured dashboard simplifies the process of visualizing and controlling the device.
ReplyDeletehttps://blog.thingsboard.io/2016/12/thingsboard-101-minor-release.html?sc=1755248312815#c462234975478223537
ReplyDeleteI absolutely loved this post! Your insights were both thoughtful and informative. Keep up the great work! Allied Service
ReplyDeleteIt provides an intuitive and scalable solution for remote control of devices. However, the tutorial could benefit from more detailed troubleshooting steps and clearer explanations of MQTT message flow to assist beginners.
ReplyDeleteGoods Elevator
This project demonstrates how to control Raspberry Pi GPIO pins remotely via MQTT using ThingsBoard. It enables seamless IoT integration, allowing real-time monitoring and device management. Ideal for beginners and developers, it showcases practical applications of MQTT communication, data visualization, and smart automation through an intuitive dashboard interface. chapter 7 bankruptcy lawyer
ReplyDeletescolinfo is an outstanding application for school administration. Its smooth performance and real-time updates make monitoring students’ academic activities easy. I appreciate the team behind it for creating a tool that simplifies communication and helps parents actively support their child’s educational progress.
ReplyDeleteI appreciate the precision in your language. Every word feels perfectly chosen E-ZPass in Delaware
ReplyDeleteThingsBoard is an open‑source IoT platform that lets you monitor and control devices, free for personal or commercial use. E-ZPass® Rhode Island
ReplyDeleteTake our free Myers Briggs Personality Test to discover your MBTI type (INTJ, ENFP, etc.). Understand your personality traits and how they affect your relationships, career, and personal growth.
ReplyDeleteThank you for sharing such a heartfelt article about the C language. You truly are a giant in the game programming world with your vast library. Manual memory management, though challenging, offers optimized performance, allowing games to run smoothly on any configuration. When coding pointers gets too confusing, I often switch to playing Friday Night Funkin to relieve stress. This fast-paced music game is excellent for improving hand-eye coordination and significantly enhances programming thinking. I wish you many more great articles!
ReplyDeleteAwesome post! It’s really helpful to see a clear explanation of how to control Raspberry Pi GPIO pins over MQTT — that’s such a useful setup for all kinds of IoT projects. Breaking down the steps and showing practical examples makes it much easier to follow along, even for those who are just getting started. I’ve been experimenting with tech projects like this between gaming breaks (even with fun titles like
ReplyDeleteSummertime Saga APK ), and guides like yours make learning new skills enjoyable. Thanks for sharing!
Nice tutorial, very easy to follow for beginners working with Raspberry Pi and MQTT. I like how real-time control is handled through the dashboard—it reminds me of how apps and games (even things like Subway Surfers Mod APK features) rely on smooth backend communication to update actions instantly. Good explanation overall, thanks for sharing.
ReplyDeleteIt enables seamless IoT integration, allowing real-time monitoring and device management. Ideal for beginners and developers, it showcases practical applications of MQTT communication, data visualization, and smart automation through an intuitive dashboard interface.
ReplyDeleteArc fault Breakers buyers in Montgomery
Take our comprehensive STAAR practice test to prepare for your actual exam.
ReplyDeleteThanks for sharing this great blog on Raspberry Pi GPIO control over MQTT using ThingsBoard. It clearly explains device provisioning, MQTT topics, rule chains, and real-time GPIO switching. A practical, beginner-friendly guide that connects hardware and cloud smoothly, enabling reliable IoT automation, monitoring, and scalable remote control with clear steps. Affordable Uncontested Divorce Lawyer Floyd County VA
ReplyDelete