Thingsboard is an open-source server-side platform that allows you to monitor and control IoT devices. It is free for both personal and commercial usage and you can deploy it anywhere. If this is your first experience with the platform we recommend to review what-is-thingsboard page and getting-started guide.
This sample application performs collection of temperature and humidity values produced by DHT22 sensor and further visualization on the real-time web dashboard. Collected data is pushed via MQTT to Thingsboard server for storage and visualization. The purpose of this application is to demonstrate Thingsboard data collection API and visualization capabilities.
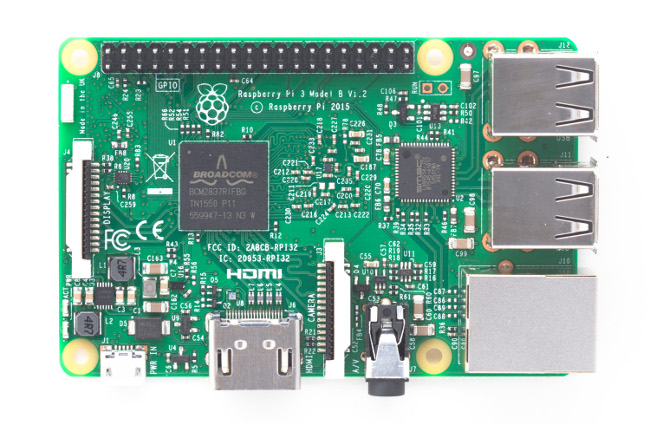
The DHT22 sensor is connected to Raspberry Pi. Raspberry Pi offers a complete and self-contained Wi-Fi networking solution. Raspberry Pi push data to Thingsboard server via MQTT protocol by using paho mqtt python library. Data is visualized using built-in customizable dashboard. The application that is running on Raspberry Pi is written on python which is quite simple and easy to understand.
The video below demonstrates the final result of this tutorial.
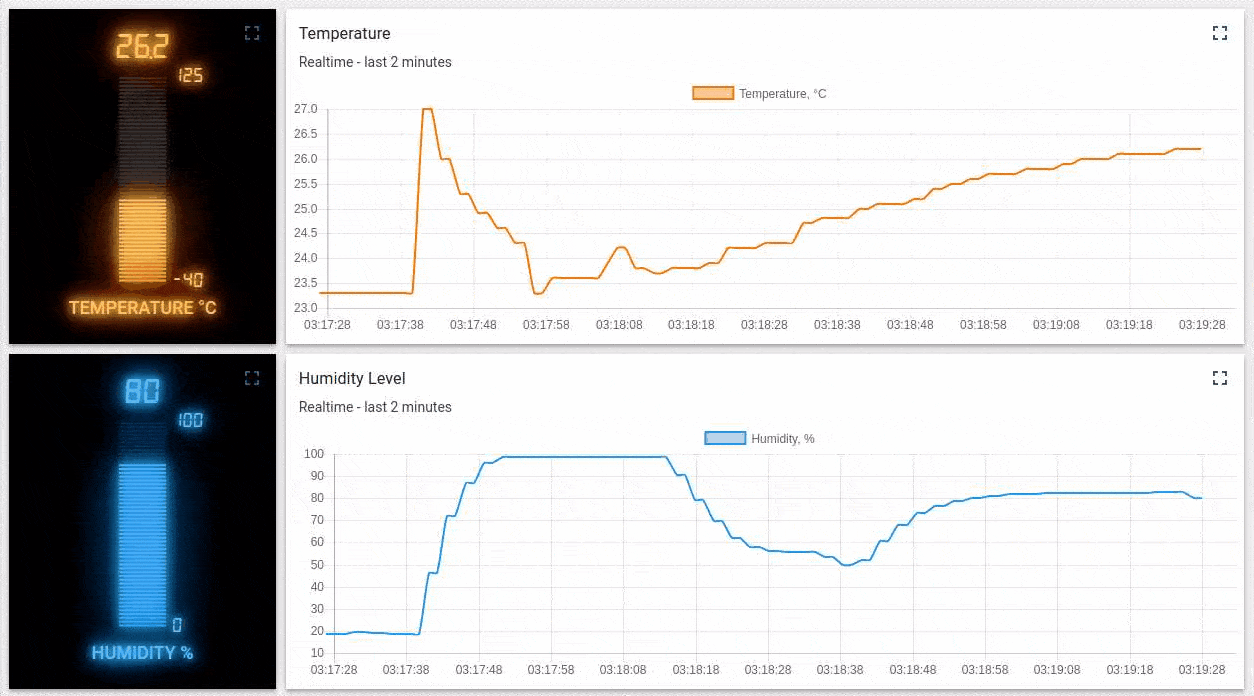
Once you complete this sample/tutorial, you will see your sensor data on the following dashboard.
Prerequisites
You will need to Thingsboard server up and running. Use either Live Demo or Installation Guide to install Thingsboard.
List of hardware and pinouts
-
Resistor (between 4.7K and 10K)
-
Breadboard
-
2 female-to-female jumper wires
-
10 female-to-male jumper wires
-
3 male-to-male jumper wire
Wiring schemes
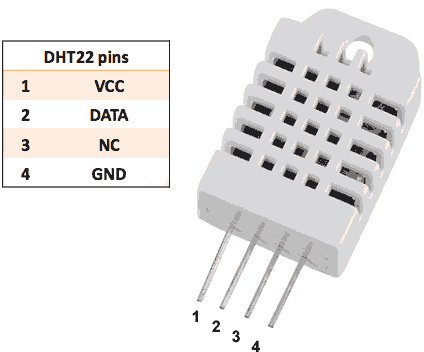
| DHT-22 Pin | Raspberry Pi Pin |
|---|---|
| DHT-22 Data | Raspberry Pi GPIO 4 |
| DHT-22 VCC | Raspberry Pi 3.3V |
| DHT-22 GND (-) | Raspberry Pi GND |
Finally, place a resistor (between 4.7K and 10K) between pin number 1 and 2 of the DHT sensor.
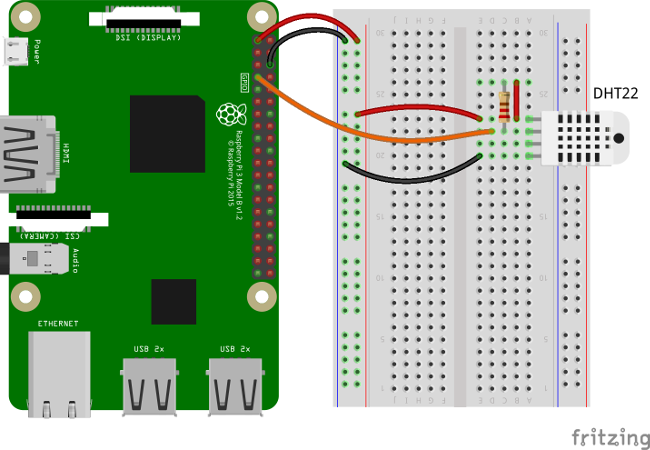
The following picture summarizes the connections for this project:
Thingsboard configuration
Note Thingsboard configuration steps are necessary only in case of local Thingsboard installation. If you are using Live Demo instance all entities are pre-configured for your demo account. However, we recommend to review this steps because you will still need to get device access token to send requests to Thingsboard.
Provision your device
This step contains instructions that are necessary to connect your device to Thingsboard.
Open Thingsboard Web UI (http://localhost:8080) in browser and login as tenant administrator
- login: [email protected]
- password: tenant
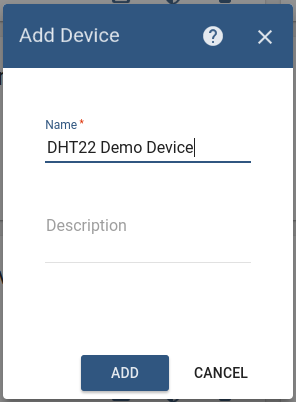
Goto “Devices” section. Click “+” button and create device with name “DHT22 Demo Device”.
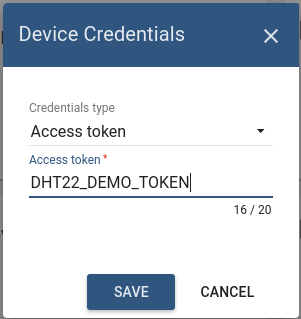
Once device created, open its details and click “Manage credentials”. Copy auto-generated access token from the “Access token” field. Please save this device token. It will be referred to later as $ACCESS_TOKEN.
Click “Copy Device ID” in device details to copy your device id to clipboard. Paste your device id to some place, this value will be used in further steps.
Provision your dashboard
This step contains instructions that are necessary to provision new dashboard with map widgets to Thingsboard.
Open “Terminal” and download file containing demo dashboard JSON:
curl -L https://thingsboard.io/docs/samples/raspberry/resources/dht22_temp_dashboard.json > dht22_temp_dashboard.json
Update dashboard configuration with your device Id (obtained in previous step) by issuing the following command:
sed -i "s/{DEVICE_ID}/<your device id>/" dht22_temp_dashboard.json
Obtain JWT token by issuing login POST command:
curl -X POST --header 'Content-Type: application/json' --header 'Accept: application/json' -d '{"username":"[email protected]", "password":"tenant"}' 'http://localhost:8080/api/auth/login'
You will receive response in the following format:
{"token":"$YOUR_JSON_TOKEN", "refreshToken": "$REFRESH_TOKEN"}
copy $YOUR_JSON_TOKEN to some place. Note that it will be valid for 15 minutes by default.
Execute dashboard upload command:
curl -X POST --header 'Content-Type: application/json' --header 'Accept: application/json' --header 'X-Authorization: Bearer $YOUR_JSON_TOKEN' -d "@dht22_temp_dashboard.json" 'http://localhost:8080/api/dashboard'
Programming the Raspberry Pi
MQTT library installation
Following command will install MQTT Python library:
sudo pip install paho-mqtt
Adafruit DHT library installation
Install python-dev package:
sudo apt-get install python-dev
Downloading and install the Adafruit DHT library:
git clone https://github.com/adafruit/Adafruit_Python_DHT.git
cd Adafruit_Python_DHT
sudo python setup.py install
Application source code
Our application consists of single python script that is well commented. You will need to modify THINGSBOARD_HOST constant to match your Thingsboard server installation IP address or hostname. Use “demo.thingsboard.io” if you are using live demo server.
The value of ACCESS_TOKEN constant corresponds to sample DHT22 demo device. If you are using live demo server - get the access token for pre-provisioned “DHT22 Demo Device”.
resources/mqtt-dht22.py |
|---|
|
Running the application
This simple command will launch the application:
python mqtt-dht22.py
Data visualization
Finally, open Thingsboard Web UI. You can access this dashboard by logging in as a tenant administrator.
In case of local installation:
- login: [email protected]
- password: tenant
In case of live-demo server:
- login: your live-demo username (email)
- password: your live-demo password
See live-demo page for more details how to get your account.
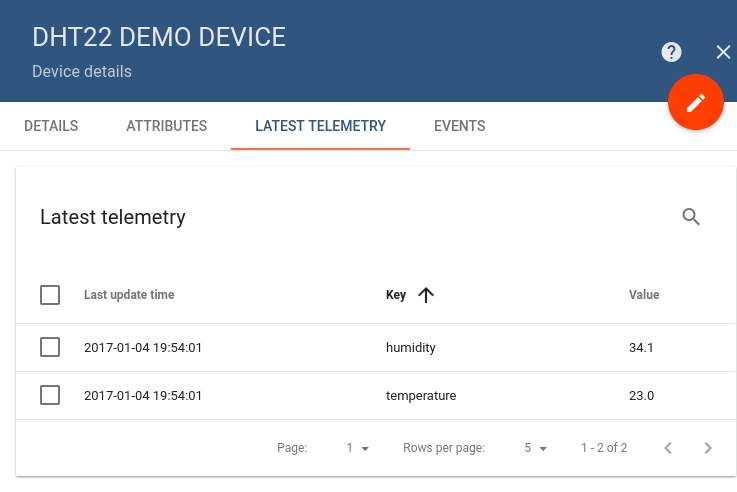
Go to “Devices” section and locate “DHT22 Demo Device”, open device details and switch to “Latest telemetry” tab. If all is configured correctly you should be able to see latest values of “temperature” and “humidity” in the table.
After, open “Dashboards” section then locate and open “DHT22: Temperature & Humidity Demo Dashboard”. As a result you will see two digital gauges and two time-series charts displaying temperature and humidity level (similar to dashboard image in the introduction).
Next steps
Browse other samples or explore guides related to main Thingsboard features:
- Device attributes - how to use device attributes.
- Telemetry data collection - how to collect telemetry data.
- Using RPC capabilities - how to send commands to/from devices.
- Rule Engine - how to use rule engine to analyze data from devices.
- Data Visualization - how to visualize collected data.
this give error
ReplyDeletecurl -X POST --header 'Content-Type: application/json' --header 'Accept: application/json' -d '{"username":"[email protected]", "password":"tenant"}' 'http://localhost:8080/api/auth/login'
error is "curl: (7) Failed to connect to localhost port 8080: Connection refused"
please help me
Do you have ThingsBoard installed locally? If not, you need to replace localhost with server address
DeleteIn above mentioned problem,I have replaced username and password with mine still its showing same error,
ReplyDeleteI also tried with "curl -v"
This comment has been removed by a blog administrator.
ReplyDeleteThis comment has been removed by a blog administrator.
ReplyDeleteA debt of gratitude is in order for a brilliant offer. Your article has demonstrated your diligent work and experience you have in this field. Splendid .i cherish it perusing. NessTool Download
ReplyDeleteYour article has provoked a considerable measure of positive hobby. I can see why since you have made such a decent showing of making it fascinating. Delta Emulator Download
ReplyDeletehi there,
ReplyDeleteI used this tutorial to setup a DHT22 Sensor and it was working just fine.
Since 2 days i get the following Error MEssage when i try to start the "mqtt-dht22.py"-Script:
Traceback (most recent call last):
File "mqtt-dht22.py", line 33, in
humidity = round(humidity, 2)
TypeError: a float is required
Do i need to change the line of Code? Because, as i said, it was working just fine, a few days ago.
Essays are personal. They allow writers to open up and share their individual ideals, opinions and aspirations utilizing their readers. This is why, essay writing, is a bit more contemplative and much less fact driven. BELL TEST
ReplyDeleteThe electronic temperature controller additionally contains indicative projects that check for equipment, framework and programming issues.CAREL Malaysia
ReplyDeleteI read the actual write-up along with totally go along with You. Your own reveal is wonderful and I will probably reveal the item along with my friends along with fb connections. Only has a website in your area of interest I would provide you with a link exchange. Your content need more coverage along with trust my own bookmarking can help you get more traffic. Great write-up, again ! ! enail kit
ReplyDeleteI am reading marketing dissertation topics, and i find a post about thingsborad. It allows you to monitor and control IoT devices. It is an open source platform, that is free for both personal and commercial usage.
ReplyDeleteBy using a DHT22 sensor, this sample application collects temperature and humidity measurements, bubble shooter which are then further visualized on a real-time online dashboard. The ThingsBoard server receives collected data over MQTT for storage and viewing. This application's goal is to show off the data gathering API and visualization capability of ThingsBoard.
ReplyDeleteWith time and various other factors, you can face issues with your Brother printer. Such as the Brother printer not printing clearly is an issue that can arise due to various causes.
ReplyDeleteHeadphones Canada is a game-changer for all music enthusiasts! Their wide selection of top-notch headphones and exceptional sound quality make them the go-to destination for audio lovers. Get ready to immerse yourself in a world of music like never before
ReplyDeleteIt's fantastic technology to use a Raspberry Pi and DHT22 sensor to update a computer on the weather via MQTT! Consider how this configuration complements the saudi medical cloud to provide beneficial health tracking.
ReplyDeleteThis post has zapatas given me a lot to think about.
ReplyDeleteThis game, aptly named Pokerogue , offers an innovative and refreshing experience for both poker enthusiasts and adventure gamers alike.
ReplyDeleteConnect the DHT22 sensor to the GPIO Pokerogue pins of the Raspberry Pi. Typically, you'll need to connect the sensor's data pin to a GPIO pin (e.g., GPIO4), the power pin to 3.3V, and the ground pin to GND.
ReplyDeleteDive into the realm of temperature sensing on our platform. Get insights on transmitting temperature information over MQTT with Raspberry Pi and DHT22 sensor.
ReplyDeleteloudoun county dui lawyer
The project involving temperature upload over MQTT using a Raspberry Pi and DHT22 sensor is a fantastic example of integrating technology for real-time data monitoring. Choosing the right stylish baseball caps can make a significant difference in your personal style.
ReplyDeleteThis is hands down the clearest explanation I’ve ever seen on this topic. I always felt like I was missing something when trying to understand it before, but this breakdown made everything click perfectly. The writer did an outstanding job of making it relatable and understandable, which is no easy feat for something like this. Thank you to the writer for making this information so approachable! Visit our link for ISO Certification in Saudi Arabia
ReplyDeleteI look forward to about blank clothing reading more from you.
ReplyDeleteGreat tutorial on uploading temperature data using MQTT! This step-by-step guide makes IoT integration much more approachable. Visit our link for ISO Certification In Saudi Arabia
ReplyDeleteJujutsu Kaisen Phantom Parade is a turn-based RPG gacha game.It features strategic battles, character development, and various game modes.
ReplyDeleteThings board is an open-source Internet of Things platform designed for device management, data collection, and visualization. It supports scalable and flexible deployment for managing devices, sensors, and gateways in various IoT use cases. The platform provides real-time data processing, analytics, and rule engine for automation. Things board is highly customizable, with support for dashboards, APIs, and integration with third-party applications.
ReplyDeletePrescription Drugs Lawyer
Real Estate Fraud Lawyer
You clearly have bigo recharge an amazing eye for detail.
ReplyDeleteThis library is used to interact with the DHT22 Sprunki sensor and retrieve temperature and humidity data.
ReplyDeleteIn New Jersey, reckless driving earns you two points on your record. In addition, it may result in penalties, court expenses, higher insurance premiums, and possible point-accumulation surcharges.
ReplyDeleteHow Many Points is Careless Driving in New Jersey
Using a Raspberry Pi and DHT22 sensor for temperature upload over MQTT is a great DIY project for IoT enthusiasts. Stay cozy while coding with oversized hoodies for men!
ReplyDeleteThis is a cool tutorial! Seems pretty straightforward, even for a beginner like me. Might give it a try this weekend and see if I can get my own little IoT project [up and running. Thanks for](https://fatedtobelovedbyvillainsfree.online) sharing!
ReplyDeleteThanks for the sharing this kind of amazing and wonderful information you have shared with us. Keep sharing this kind of knowledgeable post. I-PASS website
ReplyDeleteReally cool to see how simple it can be to upload temperature data over MQTT — the step-by-step guide is super helpful! It’s amazing how tech like this powers smart devices, just like my wireless bluetooth speaker connects seamlessly for the best experience. Thanks for the great tutorial!
ReplyDeleteLooking for dependable truck services? Venus Truck Repair has you covered with expert Trailer Repair that keeps your rig rolling. We deliver fast, professional, and long-lasting solutions — trusted by truckers who can’t afford downtime. Visit us today and see the difference.
ReplyDeleteThis text describes an open-source ThingsBoard application for monitoring IoT devices. It leverages a Raspberry Pi connected to a DHT22 sensor to collect temperature and humidity data, which is then sent via MQTT to a ThingsBoard server. The purpose is to demonstrate ThingsBoard's data collection API and real-time visualization capabilities crediblebh login on a web dashboard, with the Raspberry Pi application being a simple Python script.
ReplyDeleteWork travel can be exciting, especially when it gives you a chance to explore new places alongside your job responsibilities. For those traveling specifically for spiritual reasons, services like Umrah Packages arrangements from trusted operators make the journey smooth with complete packages. It’s a different kind of travel experience, but equally rewarding as it combines purpose with exploration.
ReplyDelete"Great tutorial! Thingsboard makes IoT monitoring simple and powerful. Using a DHT22 sensor with Raspberry Pi to collect temperature and humidity data, then pushing it via MQTT for real-time visualization, is a clear example of its API and dashboard capabilities in action." Iso 14001 Certification in Ethiopia
ReplyDelete"Excellent demo of Thingsboard’s IoT capabilities! Connecting a DHT22 sensor to Raspberry Pi, sending data via MQTT with Python, and visualizing it on a real-time customizable dashboard clearly shows how easy and powerful this open-source platform is." Iso 14001 Certification in Ethiopia
ReplyDelete"Great IoT example! Using a DHT22 sensor with Raspberry Pi to capture temperature and humidity, then uploading data via MQTT to Thingsboard for real-time visualization, shows how simple yet powerful the platform is. Python integration makes it accessible and customizable for any project." Iso 14001 Certification in Ethiopia
ReplyDelete"Excellent step-by-step guide! Using a DHT22 sensor with Raspberry Pi to collect temperature and humidity, then uploading via MQTT to Thingsboard for real-time dashboards, clearly shows the platform’s power. Easy Python integration makes IoT data collection and visualization accessible to anyone." Iso 45001 Certification in Ethiopia
ReplyDeleteThis was just the erome right length. It didn’t overstay its welcome, but it gave me exactly what I wanted.
ReplyDeleteI always felt like I was missing something when trying to understand it before, but this breakdown made everything click perfectly. The writer did an outstanding job of making it relatable and understandable, which is no easy feat for something like this.
ReplyDeleteMCW77 Casino Games
Create realistic AI videos with synchronized audio instantly. Physics-accurate motion, cinematic quality. 10 free credits, no credit card needed. Try Sora 2 now!
ReplyDeletehttps://aisora2.com/
Wan AI - Create stunning AI-generated videos online for free. Transform text or images into professional-quality videos and voiceovers with our multimodal AI platform.
ReplyDeletehttps://wanai.dev/
https://nano-bananaai.org/
ReplyDeleteNano Banana
Nano Banana's advanced AI model delivers consistent character editing and scene preservation that surpasses Flux Kontext.
Choose Nano Banana to experience the future of AI image editing with simple text prompts.