Thingsboard is an open-source server-side platform that allows you to monitor and control IoT devices. It is free for both personal and commercial usage and you can deploy it anywhere. If this is your first experience with the platform we recommend to review what-is-thingsboard page and getting-started guide.
This sample application shows capability to track GPS location of LinkIt ONE device and further visualization on the map. It performs collection of latitude and longitude values produced by GPS module. Collected data is pushed to Thingsboard for storage and visualization. The purpose of this application is to demonstrate Thingsboard data collection API and visualization capabilities.
The GPS module is built-in module of LinkIt ONE. LinkIt ONE pushes data to Thingsboard server via MQTT protocol by using PubSubClient library for Arduino. Data is visualized using map widget which is part of customizable dashboard. The application that is running on LinkIt ONE is written using Arduino SDK which is quite simple and easy to understand.
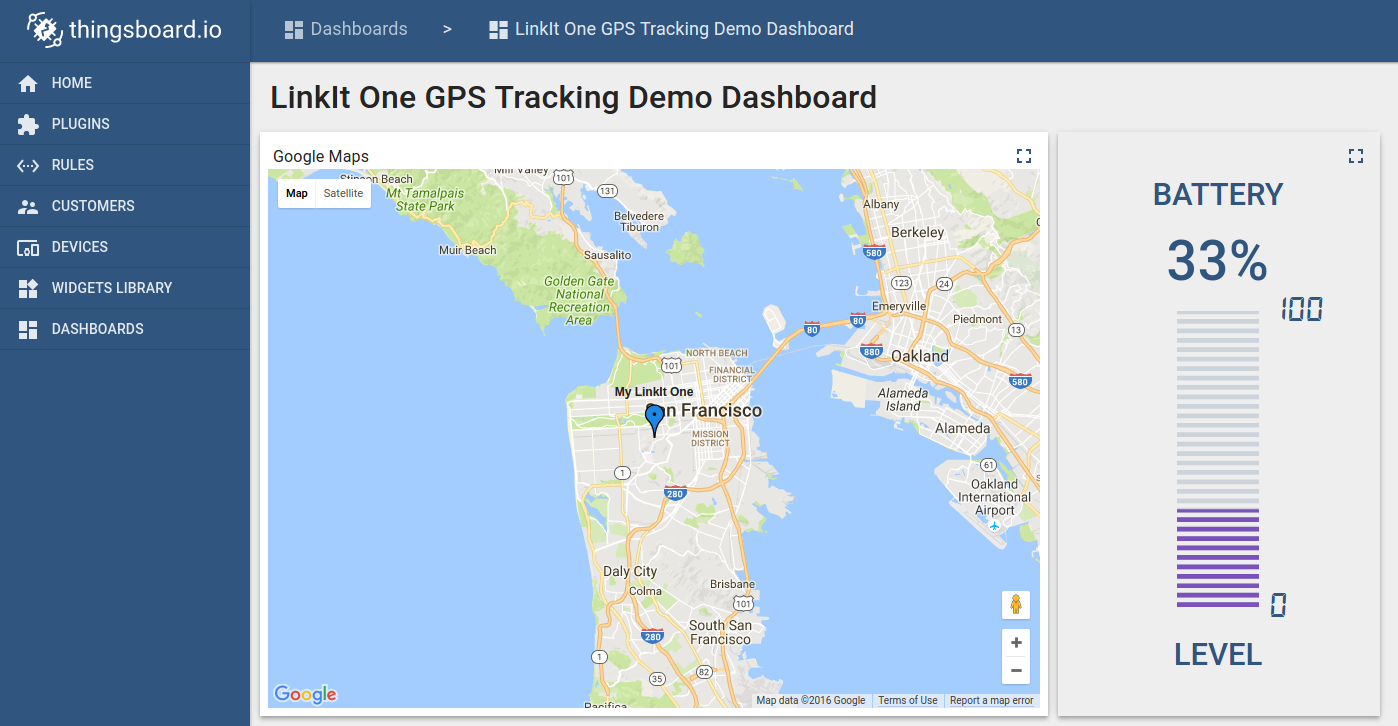
Once you complete this sample/tutorial, you will see your device GPS and battery data on the following dashboard.
Prerequisites
You will need to Thingsboard server up and running. Use either Live Demo or Installation Guide to install Thingsboard.
This tutorial was prepared for Windows OS users. However it is possible to run it on other OS (Linux or MacOS).
List of hardware
-
GPS and WIFI Antenna are shipped with board.
Thingsboard configuration
Note Thingsboard configuration steps are necessary only in case of local Thingsboard installation. If you are using Live Demo instance all entities are pre-configured for your demo account. However, we recommend to review this steps because you will still need to get device access token to send requests to Thingsboard.
Provision your device
This step contains instructions that are necessary to connect your device to Thingsboard.
Open Thingsboard Web UI (http://localhost:8080) in browser and login as tenant administrator
- login: [email protected]
- password: tenant
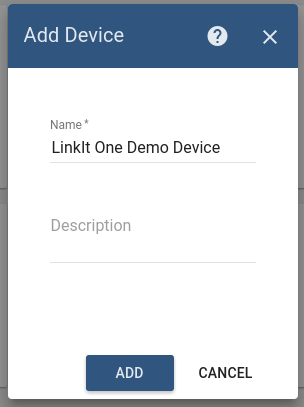
Goto “Devices” section. Click “+” button and create device with name “LinkIt One Demo Device”.
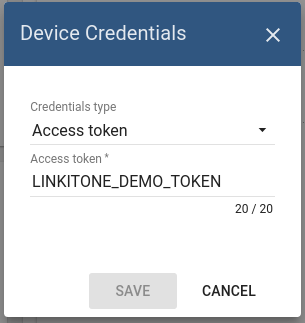
Once device created, open its details and click “Manage credentials”.
Copy auto-generated access token from the “Access token” field. Please save this device token. It will be referred to later as $ACCESS_TOKEN.
Click “Copy Device ID” in device details to copy your device id to clipboard. Paste your device id to some place, this value will be used in further steps.
Provision your dashboard
This step contains instructions that are necessary to provision new dashboard with map widgets to Thingsboard.
Open “Docker Quickstart Terminal” and download file containing demo dashboard JSON:
curl -L https://thingsboard.io/docs/samples/linkit-one/resources/linkit_one_gps_dashboard.json > linkit_one_gps_dashboard.json
Update dashboard configuration with your device Id (obtained in previous step) by issuing the following command:
sed -i "s/{DEVICE_ID}/<your device id>/" linkit_one_gps_dashboard.json
Obtain JWT token by issuing login POST command:
curl -X POST --header 'Content-Type: application/json' --header 'Accept: application/json' -d '{"username":"[email protected]", "password":"tenant"}' 'http://localhost:8080/api/auth/login'
You will receive response in the following format:
{"token":"$YOUR_JSON_TOKEN", "refreshToken": "$REFRESH_TOKEN"}
copy $YOUR_JSON_TOKEN to some place. Note that it will be valid for 15 minutes by default.
Execute dashboard upload command:
curl -X POST --header 'Content-Type: application/json' --header 'Accept: application/json' --header 'X-Authorization: Bearer $YOUR_JSON_TOKEN' -d "@linkit_one_gps_dashboard.json" 'http://localhost:8080/api/dashboard'
Programming the LinkIt One device
If you already familiar with basics of LinkIt One programming using Arduino IDE you can skip the following step and proceed with step 2.
Step 1. LinkIt ONE and Arduino IDE setup.
In order to start programming LinkIt One device you will need Arduino IDE installed and all related libraries. Please follow this guide in order to install the Arduino IDE and LinkIt One SDK:
It’s recommended to update your firmware by following this guide. To try your first LinkIt One sample, please follow this guide.
Step 2. PubSubClient library installation.
Open Arduino IDE and go to Sketch -> Include Library -> Manage Libraries. Find PubSubClient by Nick O’Leary and install it.
Note that this tutorial was tested with PubSubClient 2.6.
Download and open gps_tracker.ino sketch.
Note You need to edit following constants and variables in the sketch:
- WIFI_AP - name of your access point
- WIFI_PASSWORD - access point password
- WIFI_AUTH - choose one of LWIFI_OPEN, LWIFI_WPA, or LWIFI_WEP.
- TOKEN - the $ACCESS_TOKEN from Thingsboard configuration step.
- thingsboardServer - Thingsboard HOST/IP address that is accessable within your wifi network. Specify “demo.thingsboard.io” if you are using live demo server.
resources/gps_tracker.ino |
|---|
|
Connect your LinkIt One device via USB cable and select Serial Debug COM port in Arduino IDE. Compile and Upload your sketch to device using “Upload” button.
After application will be uploaded and started it will try to connect to Thingsboard node using mqtt client and upload “latitude” and “longitude” attributes once per second.
Troubleshooting
When application is running you can connect your device to Serial Debug COM port in Arduino IDE and open “Serial Monitor” in order to view debug information produced by serial output.
Data visualization
Finally, open Thingsboard Web UI. You can access this dashboard by logging in as a tenant administrator. Use
- login: [email protected]
- password: tenant
in case of local Thingsboard installation.
Go to “Devices” section and locate “LinkIt One Demo Device”, open device details and switch to “Attributes” tab. If all is configured correctly you should be able to see “latitude”, “longitude” and battery status attributes and theirs latest values in the table.

After, open “Dashboards” section then locate and open “LinkIt One GPS Tracking Demo Dashboard”. As a result you will see the map widget with pointer indicating your device location and battery level widget (similar to dashboard image in the introduction).
Next steps
Browse other samples or explore guides related to main Thingsboard features:
- Device attributes - how to use device attributes.
- Telemetry data collection - how to collect telemetry data.
- Using RPC capabilities - how to send commands to/from devices.
- Rule Engine - how to use rule engine to analyze data from devices.
- Data Visualization - how to visualize collected data.
I need to test this software, it is possible to replace this vehicle track system uboro. I started use this for a long time, since I had to control my son. Now I do not have such a need, but it would be in case of force majeure find him.
ReplyDeleteIt’s great to see how technology like vehicle tracking systems has helped in the past. Just like how Strong Arm Welding provides reliable and protective gear for workers, having the right tools—whether it's for safety or monitoring—can offer peace of mind. We specialize in providing premium welding protection gear, including jackets, sleeves, aprons, and gloves.
DeleteReduce Fuel and Maintenance Costs – The average operating cost per vehicle is about $1.50 per mile. A company can reduce at least 25 miles per week for each vehicle with a RMT Rover GPS Tracking System. ELD Mandate
ReplyDeleteTechnology and safety go hand in hand, much like how Spire Building Supplies ensures every door is built to last. Whether it’s tracking systems or durable doors, having reliable solutions in place is always a smart choice. We specialize in offering high-performance, durable doors for various needs.
DeleteThis comment has been removed by the author.
ReplyDeleteI think it's not right! we all have to respect privacy of each other. I like Trump but in this situation I can't agree with this man! Hope, he will decide not to do it. By the way, my good friend told me she wanted to know waht her child do when she is away. And she decided to install this Hoverwatch phone tracker. Good luck!
ReplyDeleteis it possible to add multipel tracking devices on "MAP" and monitoring them??
ReplyDeleteNice post. Thank you for you great article
ReplyDeleteGreat post. thank you.
ReplyDeleteDigital marketing course in chennai
I have this website called
Deletetow truck services in Queens I need to do digital marketing on it . about your course is it for your own country or any body from any can learn here, and what are you charging for teaching the digital marketing . I specially want to learn seo.
Hi there, I read your blogs on a regular basis. Your humoristic style is witty, keep it up! Thank You for Providing Such a Unique and valuable information, If you
ReplyDeleteare looking for the best Gps Tracker For Kids, then visit Vimel Technology Pty Ltd.I enjoyed this blog post.
Real-time tracking is the main reason for buying a GPS Tracker. Real-time GPS tracking differs from one tracking device to another. Some tracking devices do not offer the ability to manually ping the tracker which allows you to know its exact location at any time and others only offer a location update at pre-defined intervals. Fleet Management Solutions
ReplyDeleteAfter Reading your article about features of GPS Tracker, I get some good knowledge about it. You very well defined about the GPS system which is quite unique. Thanks for sharing such good information. Car GPS Ireland.
ReplyDeleteThe blog was having very informative content and very useful for me. Well done post and keep it up... Thanks for sharing such a Useful info. tableau automation
ReplyDeleteHow do I start to learn how to Hip Hop dance? GPS tracker
ReplyDeleteMany radio broadcasts are overhauling their transmission innovation, with some contribution HD2 multicast channels.ADN GPS
ReplyDeleteYou wrote this post very carefully. The amount of information is stunning and also a gainful article for us. Keep sharing this kind of articles, Thank you. spy software
ReplyDeleteThanks for sharing the post.. parents are worlds best person in each lives of individual..they need or must succeed to sustain needs of the family. www.meridiannorstar.net
ReplyDeleteI was surfing the Internet for information and came across your blog. I am impressed by the information you have on this blog. It shows how well you understand this subject. tracking devices
ReplyDeleteIt is truly a well-researched content and excellent wording. I got so engaged in this material that I couldn’t wait to read. Read more info about car trackers ireland. I am impressed with your work and skill. Thanks.
ReplyDeleteI am impressed with your work and skills visit also Telematics Service
ReplyDeletethanks for all of this. Rip Wheeler Jacket
ReplyDeleteKeep it up. Yellowstone Rip Jacket
ReplyDeleteAmazing really. Very hard work for me. Yellowstone Rip Trucker Jacket
ReplyDeleteClearly, It is an engaging article for us which you have provided here about vessel fleet tracking system. This is a great resource to enhance knowledge about it. Thank you.
ReplyDeleteI like the way you have explained things and I also want to showcase my website Web hosting “Write for us” that provides you information about guest posting.
ReplyDeleteI think this is one of the most significant pieces of information for me about Specialty Pharmacies Medication Tracking . And I'm glad to read your article. Thank you for sharing!
ReplyDeleteNice info, I am very thankful to you for sharing this important knowledge. This information is helpful for everyone. Read more info about truck gps tracker. So please always share this kind of information. Thanks.
ReplyDeleteيتسائل الجميع لماذا يطلق علي دكتور محمود ناصر افضل دكتور اوعية دموية في مصر لانه الدكتور الوحيد في مصر الذي يقوم بعلاج دوالي الساقين بدون جراحة باستعمال احدث تقنية في العصر الحالي تقنية الكلاكس
ReplyDeletethanks for all of this. A very good content you shared here. I liked your work and the way in which you have shared this blog here. you can use OBD Port, the Automotive Electronic Diagnostic equipment use to check the Errors of a Car. And Get the complete automotive solution for your vehicle.
ReplyDeleteI appreciate the efforts which you have put into this post. This post provides a good idea. Genuinely, it is a useful post to increase our knowledge. Thanks for sharing such content here. Visit also Gps Tracking Hardware Australia
ReplyDelete
ReplyDeleteI liked your work and the way you have shared this blog here. Very nice stuff you shared here. You can use obd device, an automotive electronic diagnostic tool which is used to check for car
Winter clothing presents a range of challenges. We appreciate you teaching us about winter clothing trends.Faux Leather Jackets Thank You for sharing
ReplyDeleteTikTok is a social media app that allows people to share short videos with each other. It's a place for people to watch and upload short video clips of themselves, which are usually 15 seconds long. If you want to save your favourite TikTok videos, then this is the Snaptik app that helps you download TikTok videos on your Android device.
ReplyDeleteData Mining Assignment Help
ReplyDeleteProfessionally Written Data Mining Assignment Help
Data Mining assignments are about understanding the data, preparing the data for analysis and then comes data modelling, evaluation and deployment. Completing data mining coursework is time-consuming and demands focus and accuracy at every stage to ensure excellent grades. Many students don’t have the knowledge or time to complete the assignments and they come to us for data mining assignment help. After receiving multiple queries of data mining coursework help from our repeat customers, we finally started the service in 2014.
Today, we are the leaders in providing data mining homework help to students in the USA, UK, Australia, Canada, UAE, and various other European countries. Students who aspire to get an A grade in their statistics coursework, seek our expert’s guidance in the form of Data Mining Assignment Help and online tutoring. for more visit us at - https://archliteassignments.co.uk/data-mining-assignment-help/
Infinity Advertisement is the best digital marketing company In Delhi , India offers SEO, PPC, Social media, Web design/development services. Contact a top digital marketing agency in Delhi, India to improve your ROI.
ReplyDeleteIt’s really a nice and useful piece of information. I am glad that you shared this useful information with us. Please keeps us to date like this .thank you for sharing
ReplyDeleteabogados de quiebras
semi truck accident attorneys
Thank you for sharing such an interesting article; it is definitely worth reading. I've subscribed to you and will now check your profile daily for interesting content.
ReplyDeleteleather motorcycle jackets for men
Wow, this article on GPS data upload and visualization using LinkIt ONE and Thingsboard was incredibly helpful! I've been looking for a comprehensive guide on how to work with GPS data, and this tutorial provided clear instructions and explanations. Thanks for sharing Aviator Brown Bomber Jacket!
ReplyDeleteAdmiration for the blog's beauty and the tutorial's excellence. Kill Em Hoodie
ReplyDeleteThe tutorial's educational value is highly appreciated. Kill Em Hoodie
ReplyDeleteCaptivating blog design matched with a valuable tutorial. Kill Em Hoodie
ReplyDeleteThe blog's aesthetics enhance the impact of the tutorial. Stussy 8 Ball Sherpa
ReplyDeleteExpressing gratitude for the shared, insightful tutorial. Stussy 8 Ball Sherpa
ReplyDeleteCommendable tutorial shared through a beautiful blog. Stussy 8 Ball Sherpa
ReplyDeleteSincere thanks for the enriching tutorial content. Stussy 8 Ball Sherpa
ReplyDeleteThe blog's beauty amplifies the value of the tutorial. Stussy 8 Ball Sherpa
ReplyDeleteAppreciation for the valuable insights in the tutorial. Stussy 8 Ball Sherpa
ReplyDeleteImpressed by the tutorial's quality and the blog's aesthetics. Stussy 8 Ball Sherpa
ReplyDeleteThankful for the well-structured and informative tutorial. Stussy 8 Ball Sherpa
ReplyDeleteThe tutorial's excellence is greatly acknowledged. Stussy 8 Ball Sherpa
ReplyDeleteThe blog's visual appeal adds to the tutorial's worth. Stussy 8 Ball Sherpa
ReplyDeleteExpressing gratitude for the valuable information shared. Stussy 8 Ball Sherpa
ReplyDeleteImpressed by the tutorial's depth and the blog's design. Stussy 8 Ball Sherpa
ReplyDeleteThe tutorial's impact is enhanced by the blog's elegance. Stussy 8 Ball Sherpa
ReplyDeleteCommendable tutorial, a great addition to the blog. Stussy 8 Ball Sherpa
ReplyDeleteThanking for the informative content presented. Stussy 8 Ball Sherpa
ReplyDeleteThe blog's aesthetic charm complements the tutorial. Stussy 8 Ball Sherpa
ReplyDeleteValuable insights shared through an appealing blog. Stussy 8 Ball Sherpa
ReplyDeleteAppreciation for the enlightening tutorial provided. Stussy 8 Ball Sherpa
ReplyDeleteImpressed by the tutorial's quality and the blog's beauty. Stussy 8 Ball Sherpa
ReplyDeleteThe tutorial significantly adds to the blog's value. Stussy 8 Ball Sherpa
ReplyDeleteExpressing gratitude for the valuable tutorial's sharing. Stussy 8 Ball Sherpa
ReplyDeleteThe blog's aesthetics amplify the tutorial's worth. Stussy 8 Ball Sherpa
ReplyDeleteCommendable tutorial shared through an elegant blog. Stussy 8 Ball Sherpa
ReplyDeleteThankful for the insightful content and beautiful design. Stussy 8 Ball Sherpa
ReplyDeleteImpressed by the tutorial's educational impact. Stussy 8 Ball Sherpa
ReplyDeleteThe blog's aesthetics enhance the tutorial's quality. Stussy 8 Ball Sherpa
ReplyDeleteValuable insights shared through the well-crafted blog. Stussy 8 Ball Sherpa
ReplyDeleteAppreciating the tutorial's excellence and the blog's beauty. Stussy 8 Ball Sherpa
ReplyDeleteThe blog's design perfectly complements the tutorial. Stussy 8 Ball Sherpa
ReplyDeleteYou wrote this post very carefully.車 gps 発信 機 The amount of information is stunning and also a gainful article for us. Keep sharing this kind of articles, Thank you.
ReplyDeleteThe article on GPS data upload and visualization using LinkIt ONE and Thingsboard is informative, well-explained, and accessible. It highlights practical applications, practical applications, and the integration of GPS technology with IoT, making it a valuable resource. chesapeake personal injury lawyer
ReplyDeleteSeasoned multi state family law attorneys providing adept guidance and tailored solutions for intricate legal matters. Trust our experienced team for comprehensive and empathetic representation.
ReplyDeleteEnhance your social media game effortlessly! Purchase Twitter likes to increase visibility and credibility. Instant delivery and genuine results guaranteed.
ReplyDeleteThe project demonstrates the potential of using IoT technologies like LinkIt ONE and ThingsBoard for real-time tracking and monitoring applications. It integrates GPS data upload and visualization, making it accessible to beginners in IoT development. The combination of LinkIt ONE's GPS module and ThingsBoard's dashboard capabilities allows users to track location data and visualize it in a user-friendly interface. However, more in-depth troubleshooting tips could be beneficial. Overall, this project showcases the potential of IoT technologies for efficient GPS data management and visualization in various applications.
ReplyDeleteDomestic violence New Jersey
Möchten Sie Ihre Bekanntheit steigern und ein größeres Publikum erreichen? Dann ist es vielleicht an der Zeit, TikTok Likes Kaufen. Hier ist der Grund:
ReplyDeleteTo analyze geographical information using GPS data, follow these steps: 1) Collect GPS data in formats like GPX, CSV, or JSON, 2) Prepare your environment using Python, which has powerful libraries for data handling and visualization, and 3) Install necessary libraries like pandas folium and folium for data manipulation and interactive maps. 4) Upload and read the GPS data file using a Python script, and 5) Visualize the data on a map using Folium. 6) Run the Python script to generate an interactive map with the GPS data. 7) Customize the map with marker types, layer control, and heatmaps for more advanced visualization. This process allows for detailed geographical analysis and better understanding of spatial patterns in the data criminal defense lawyer alexandria va.
ReplyDeleteGiven the emotional and legal challenges of divorce, having a lawyer can provide crucial support. If you're wondering How long Divorce Takes in New York , a divorce lawyer can offer expert legal guidance to help navigate the process. Reach out to us today for more information.
ReplyDeleteGPS data upload and visualization can be effectively managed using various tools and approaches. Software tools like Google Earth, QGIS, ArcGIS, GPS Visualizer, Python libraries like folium and geopandas, and JavaScript libraries like Leaflet.js and D3.js can be used for data visualization. Online platforms like Mapbox offer APIs for creating custom maps and real-time data visualization. Popular apps like Strava and MapMyRun can be used for tracking and visualizing GPS data related to fitness and activities Fairfax Criminal Defense Attorney.
ReplyDeleteThe process of uploading and visualizing GPS data involves several steps: data collection, uploading to a geospatial data platform, processing the data to extract relevant information, plotting the data on a map using Python libraries like folium, plotly, or geopandas, and using online platforms like Google My Maps or ArcGIS Online. Analyzing the data can help track movement over time, identify patterns, and calculate distances and speeds New Jersey Careless Driving.
ReplyDeleteJust because you are seeing 554 angel number twin flame does not mean your twin flame is coming. Look out for more signs.
ReplyDeleteGreat spot for absolute bagels a quick lunch!
ReplyDeleteProperty distribution, child custody, and other crucial issues are among the legal complexity of ending a marriage that are handled by divorce attorneys. In court, they try to represent your best interests or negotiate just settlements. The legal and emotional challenges of divorce make having an experienced lawyer by your side crucial. In divorce lawyers northern VA can offer professional advice specific to your circumstances. Speak with us now to find out more.
ReplyDeleteGreat tutorial on uploading and visualizing GPS data with LinkIt ONE and ThingsBoard! It’s clear and easy to follow. Also, check out Bomber Jackets for stylish, durable outerwear!
ReplyDeleteThe article "GPS Data Upload and Visualization Using LinkIt ONE and ThingsBoard" demonstrates how to track the GPS location of a LinkIt ONE device and visualize the data on a map. It details the process of collecting latitude and longitude values from the device's GPS module, transmitting the data to ThingsBoard via MQTT protocol, and displaying it using a map widget on a customizable dashboard. New York State No Fault Divorce can be granted if the marriage has been irretrievably broken for at least six months. This allows couples to dissolve their marriage without assigning blame, simplifying the divorce process.
ReplyDeleteLove the Salvations Edge jacket—its sharp, futuristic lines and intricate detailing give it a standout presence.
ReplyDeleteIt’s the perfect piece to flex in-game and adds a bold touch to any Guardian’s look.
Truly one of the coolest cosmetics around!
Tim in Monarch Legacy of Monsters adds a relatable depth to the story with his grounded, everyman character. His journey through the MonsterVerse highlights the human side of facing monumental challenges.
ReplyDeleteLooking for dependable truck services? Venus Truck Repair has you covered with expert Trailer Repair that keeps your rig rolling. We deliver fast, professional, and long-lasting solutions — trusted by truckers who can’t afford downtime. Visit us today and see the difference.
ReplyDeleteHere’s the catch: not all dog sounds are whistles. Growls and howls often fall in our audible range, but dogwhistlesound (high-pitched) or yelps can creep into ultrasonic dog vocalizations. (According to a 2018 study in Animal Cognition, dogs’ vocal range spans 20 Hz to 45,000 Hz!)
ReplyDeleteExcellent walkthrough on integrating GPS data with ThingsBoard—clear and practical! Just like this setup helps track movement precisely, highline building supplies ensures precision in every product delivered.
ReplyDeleteGreat article! Real-time GPS data visualization is a game changer for IoT applications. spire building supplies values that same level of control and accuracy in construction solutions.
ReplyDeleteThis was such an insightful read! Visualizing GPS data with ThingsBoard shows how powerful simple tools can be when used right—exactly the kind of thinking unique enterprises promotes in all its projects.
ReplyDeleteVery informative and well explained! Visualizing GPS data this clearly is a game changer. At meedar, we’re all about smart, efficient tech like this.
ReplyDeleteExcellent post! The ability to upload and visualize GPS data is a powerful tool for improving tracking and analysis. Just as technology enhances our capabilities, using reliable gear like leather welding gloves ensures safety and efficiency in the field. Keep up the great work!
ReplyDeleteDeliciously described Chowmein from Hot N Spicy! this post really made me hungry. Great content and amazing spotlight on a classic dish.
ReplyDeleteI’ve really enjoyed your recent articles—they’re insightful, well-paced, and always leave a lasting impression! silco arcane cosplay
ReplyDeleteGreat project! The GPS data upload and visualization using LinkIt ONE and Thingsboard looks impressive. Meanwhile, the huf x marvel ghost rider jacket adds unique style.
ReplyDelete
ReplyDeletemason young ozark
is a complex and tragic character whose story highlights the darker consequences of desperation and faith in conflict. A preacher drawn into the criminal underworld, his journey from idealism to downfall adds depth and tension to the series. Mason’s role not only challenges the Byrdes’ morality but also leaves a lasting impact on the show’s themes of trust, power, and sacrifice.
The best wood flooring completely changed my home’s vibe. Stylish, durable, and easy to clean—makes every room feel premium.
ReplyDeleteThe beef seekh kabab chatni roll never disappoints. Full of flavor, perfectly cooked, and super satisfying—definitely a favorite street food delight.
ReplyDeleteExploring Montenegro real estate is exciting! From luxury villas to high-potential rental properties, the market is ideal for investors seeking long-term growth.
ReplyDeleteI highly recommend these Leather Work Gloves. Perfect for industrial, mechanical, and outdoor work. Durable, safe, and very comfortable.
ReplyDeleteGreat article! While working with industrial systems and IoT, safety matters just as much. I’ve been using Uniqent welding jackets — excellent heat protection and grip — and they’ve really made a difference on tough jobs.
ReplyDeleteVery informative post. On a lighter note, if you ever drop by Karachi, you’ve got to try the best chicken tikka in Karachi at Hot N Spicy — delicious, smoky, and easily one of the best in the city!
ReplyDeleteThis write-up on data pipelines is inspiring. Speaking of solid foundations, when constructing anything, Spire Building Supplies is my go-to — top quality materials and reliable service.
ReplyDeleteFantastic post! Your clarity and perspective always stand out. Can’t wait to read what you share next! Maryland E-ZPass
ReplyDeleteHighly appreciate your Winter Jackets for Women - Films Jackets work and research. Thank you
ReplyDeleteThe Materialists Dakota Johnson Red Blazer is bold, stylish, and effortlessly chic. I love how the vibrant red adds a pop of color while the tailored design keeps it polished. Definitely a statement piece that elevates any outfit.
ReplyDelete