Thingsboard is an open-source server-side platform that allows you to monitor and control IoT devices. It is free for both personal and commercial usage and you can deploy it anywhere. If this is your first experience with the platform we recommend to review what-is-thingsboard page and getting-started guide.
This sample application performs collection of temperature and humidity values produced by DHT22 sensor and further visualization on the real-time web dashboard. Collected data is pushed via MQTT to Thingsboard server for storage and visualization. The purpose of this application is to demonstrate Thingsboard data collection API and visualization capabilities.
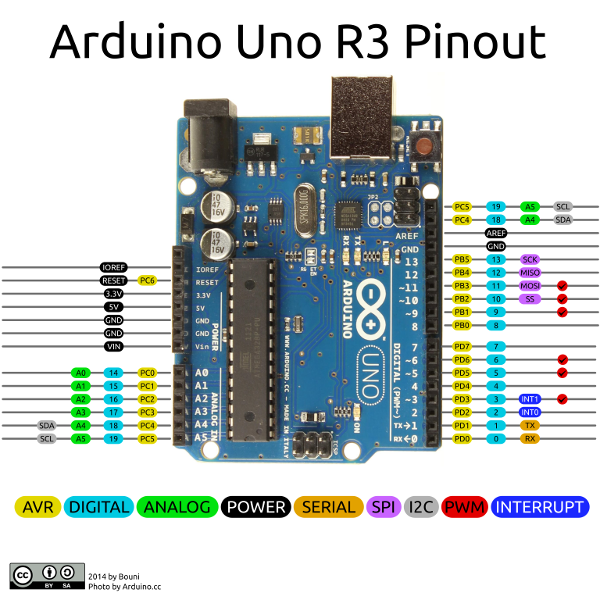
The DHT22 sensor is connected to Arduino UNO. Arduino UNO connects to the WiFi network using ESP8266. Arduino UNO push data to Thingsboard server via MQTT protocol by using PubSubClient library for Arduino. Data is visualized using built-in customizable dashboard. The application that is running on Arduino UNO is written using Arduino SDK which is quite simple and easy to understand.
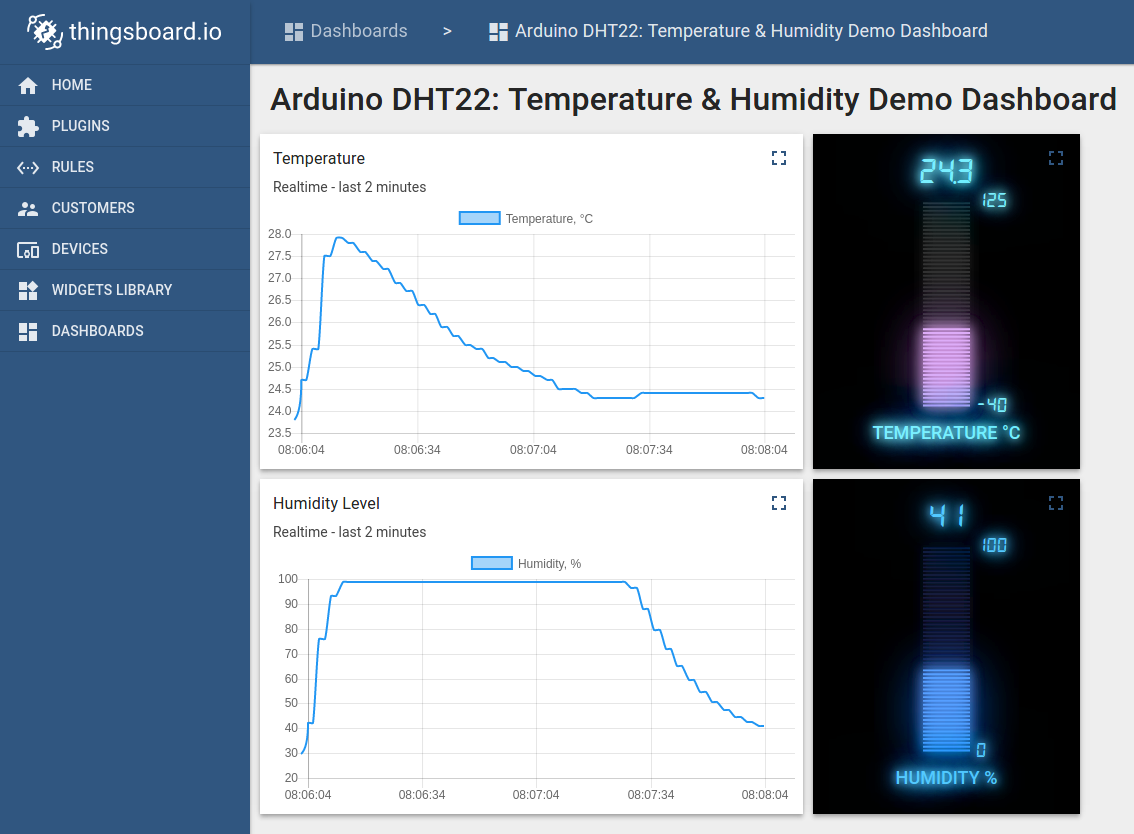
Once you complete this sample/tutorial, you will see your sensor data on the following dashboard.
Prerequisites
You will need to Thingsboard server up and running. Use either Live Demo or Installation Guide to install Thingsboard.
List of hardware and pinouts
-
Resistor (between 4.7K and 10K)
-
Breadboard
-
2 female-to-female jumper wires
-
11 female-to-male jumper wires
-
3 male-to-male jumper wire
ESP8266 Firmware
In the current tutorial WiFiEsp Arduino library is used to connect Arduino board to the internet. This library supports ESP SDK version 1.1.1 and above (AT version 0.25 and above). Please make sure that your ESP8266 has compatible firmware. You can download and flash AT25-SDK112 firmware which is tested in this tutorial.
Please note that serial baud rate of ESP8266 should be set to 9600 by the following AT command:
AT+UART_DEF=9600,8,1,0,0
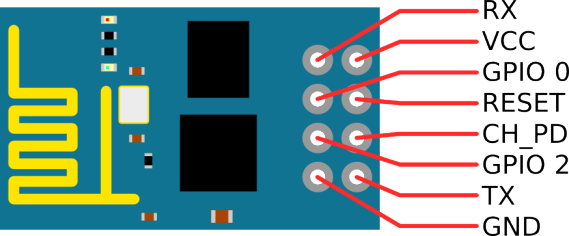
Wiring schema
| Arduino UNO Pin | ESP8266 Pin |
|---|---|
| Arduino UNO 3.3V | ESP8266 VCC |
| Arduino UNO 3.3V | ESP8266 CH_PD |
| Arduino UNO GND | ESP8266 GND (-) |
| Arduino UNO D2 | ESP8266 RX |
| Arduino UNO D3 | ESP8266 TX |
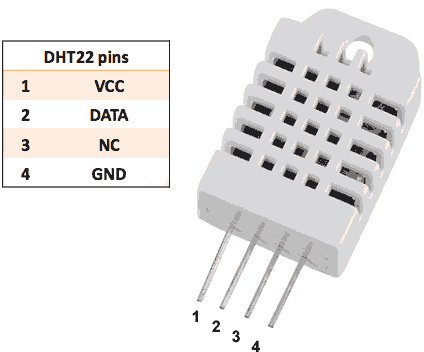
| Arduino UNO Pin | DHT-22 Pin |
|---|---|
| Arduino UNO 5V | DHT-22 VCC |
| Arduino UNO GND | DHT-22 GND (-) |
| Arduino UNO D4 | DHT-22 Data |
Finally, place a resistor (between 4.7K and 10K) between pin number 1 and 2 of the DHT sensor.
The following picture summarizes the connections for this project:

Thingsboard configuration
Note Thingsboard configuration steps are necessary only in case of local Thingsboard installation. If you are using Live Demo instance all entities are pre-configured for your demo account. However, we recommend to review this steps because you will still need to get device access token to send requests to Thingsboard.
Provision your device
This step contains instructions that are necessary to connect your device to Thingsboard.
Open Thingsboard Web UI (http://localhost:8080) in browser and login as tenant administrator
- login: [email protected]
- password: tenant
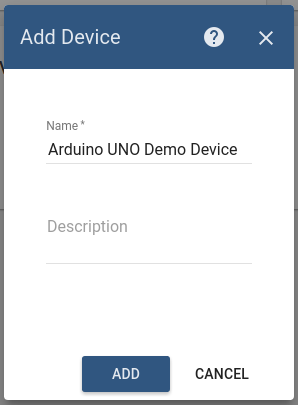
Goto “Devices” section. Click “+” button and create device with name “Arduino UNO Demo Device”.
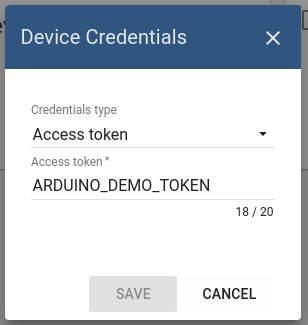
Once device created, open its details and click “Manage credentials”.
Copy auto-generated access token from the “Access token” field. Please save this device token. It will be referred to later as $ACCESS_TOKEN.
Click “Copy Device ID” in device details to copy your device id to clipboard. Paste your device id to some place, this value will be used in further steps.
Provision your dashboard
This step contains instructions that are necessary to provision new dashboard with map widgets to Thingsboard.
Open “Terminal” and download file containing demo dashboard JSON:
curl -L https://thingsboard.io/docs/samples/arduino/resources/arduino_dht_temp_dashboard.json > arduino_dht_temp_dashboard.json
Update dashboard configuration with your device Id (obtained in previous step) by issuing the following command:
sed -i "s/{DEVICE_ID}/<your device id>/" arduino_dht_temp_dashboard.json
Obtain JWT token by issuing login POST command:
curl -X POST --header 'Content-Type: application/json' --header 'Accept: application/json' -d '{"username":"[email protected]", "password":"tenant"}' 'http://localhost:8080/api/auth/login'
You will receive response in the following format:
{"token":"$YOUR_JSON_TOKEN", "refreshToken": "$REFRESH_TOKEN"}
copy $YOUR_JSON_TOKEN to some place. Note that it will be valid for 15 minutes by default.
Execute dashboard upload command:
curl -X POST --header 'Content-Type: application/json' --header 'Accept: application/json' --header 'X-Authorization: Bearer $YOUR_JSON_TOKEN' -d "@arduino_dht_temp_dashboard.json" 'http://localhost:8080/api/dashboard'
Programming the Arduino UNO device
If you already familiar with basics of Arduino UNO programming using Arduino IDE you can skip the following step and proceed with step 2.
Step 1. Arduino UNO and Arduino IDE setup.
In order to start programming Arduino UNO device you will need Arduino IDE installed and all related software.
Download and install Arduino IDE.
To learn how to connect your Uno board to the computer and upload your first sketch please follow this guide.
Step 2. Install Arduino libraries.
Open Arduino IDE and go to Sketch -> Include Library -> Manage Libraries. Find and install the following libraries:
- PubSubClient by Nick O’Leary.
- WiFiEsp by bportaluri
- Adafruit Unified Sensor by Adafruit
- DHT sensor library by Adafruit
Note that this tutorial was tested with the following versions of the libraries:
- PubSubClient 2.6
- WiFiEsp 2.1.2
- Adafruit Unified Sensor 1.0.2
- DHT sensor library 1.3.0
Step 3. Prepare and upload sketch.
Download and open arduino-dht-esp8266-mqtt.ino sketch.
Note You need to edit following constants and variables in the sketch:
- WIFI_AP - name of your access point
- WIFI_PASSWORD - access point password
- TOKEN - the $ACCESS_TOKEN from Thingsboard configuration step.
- thingsboardServer - Thingsboard HOST/IP address that is accessible within your wifi network. Specify “demo.thingsboard.io” if you are using live demo server.
resources/arduino-dht-esp8266-mqtt.ino |
|---|
|
Connect your Arduino UNO device via USB cable and select “Arduino/Genuino Uno” port in Arduino IDE. Compile and Upload your sketch to device using “Upload” button.
After application will be uploaded and started it will try to connect to Thingsboard node using mqtt client and upload “temperature” and “humidity” timeseries data once per second.
Troubleshooting
When application is running you can select “Arduino/Genuino Uno” port in Arduino IDE and open “Serial Monitor” in order to view debug information produced by serial output.
Data visualization
Finally, open Thingsboard Web UI. You can access this dashboard by logging in as a tenant administrator. Use
- login: [email protected]
- password: tenant
in case of local Thingsboard installation.
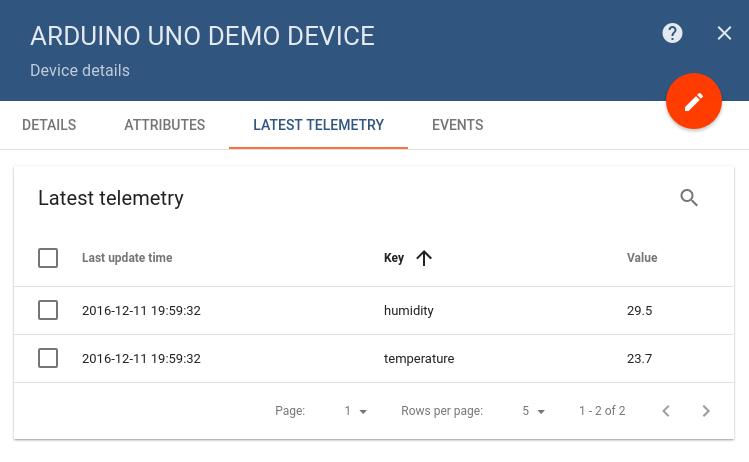
Go to “Devices” section and locate “Arduino UNO Demo Device”, open device details and switch to “Latest telemetry” tab. If all is configured correctly you should be able to see latest values of “temperature” and “humidity” in the table.
After, open “Dashboards” section then locate and open “Arduino DHT22: Temperature & Humidity Demo Dashboard”. As a result you will see two time-series charts and two digital gauges displaying temperature and humidity level (similar to dashboard image in the introduction).
Next steps
Browse other samples or explore guides related to main Thingsboard features:
- Device attributes - how to use device attributes.
- Telemetry data collection - how to collect telemetry data.
- Using RPC capabilities - how to send commands to/from devices.
- Rule Engine - how to use rule engine to analyze data from devices.
- Data Visualization - how to visualize collected data.
Love this article! Useful and informative. looking forward to see more like this. Also check this out Arduino Shields UK. Thank you.
ReplyDeleteYou have given great content here.solar panel installation services palm beach county I am glad to discover this post as I found lots of valuable data in your article. Thanks for sharing an article like this.
ReplyDeleteThe delightful article you have posted here. This is a good way to increase our knowledge. 1000W double ended grow light Continue sharing this kind of articles, Thank you.
ReplyDeleteIt is what I was searching for is really informative. Vanity Store Yonkers Ny It is a significant and useful article for us. Thankful to you for sharing an article like this.
ReplyDeleteI just need to say this is a well-informed article which you have shared here about topic. party lights hire It is an engaging and gainful article for us. Continue imparting this sort of info, Thanks to you.
ReplyDeleteA commitment of appreciation is all together for the reliably steady exercise. Achieves the best outcome! The methodology worked for me because of the space people for the system. Live IQ Subway Mobile
ReplyDeleteGot to know about the list of hardware and pinouts while I take off the unnecesary stress to compare strategies for managing stress for I was helped out by the academic assignment writing professionals.
ReplyDeleteThank you for the consistent support and guidance. Attains the basketball stars optimal result.
ReplyDeleteA pledge of gratitude is sent to everyone for the consistently consistent workout. Gets the greatest result possible! bitlife
ReplyDeleteThe blog provides a clear and concise guide on uploading temperature data over MQTT, making it accessible for beginners. The step-by-step instructions are well-organized, facilitating easy implementation. It's a valuable resource for anyone interested in IoT development, offering practical insights and solutions. Overall, an excellent contribution to the IoT community.
ReplyDeleteAccused Of Domestic Violence in New Jersey
Driving Without A License New Jersey
At an oceanfront ice cream shop, you've embarked on a serene summer employment venture, only to find chaos ensue as Papa Louie's clientele flood the island! Welcome to papa's freezeria
ReplyDeleteAs we explore temperature data upload over MQTT, it’s essential to consider the cyber security implications of IoT solutions. The involvement of individuals like Mr. Baazov in cybercrime underscores the importance of securing IoT systems against potential breaches. Implementing strong encryption and authentication measures for MQTT communications can significantly reduce vulnerabilities. Ensuring that your IoT devices and data transmission protocols are fortified against unauthorized access will protect against potential threats. Let’s stay proactive in securing our digital infrastructure to safeguard valuable data and maintain the integrity of our systems.
ReplyDeleteOne of the greatest benefits of Drive Mad is stress relief. The game's high-speed, action-packed gameplay can serve as a great outlet for releasing stress and anxiety. It provides an immersive experience that allows players to temporarily escape from their daily routines and responsibilities.
ReplyDeleteThe chef really knows wicked spoon how to combine flavors in a unique way.
ReplyDeleteThis step contains instructions that are necessary to provision new dashboard with map widgets to Thingsboard. Maxim Time Clock
ReplyDeleteHigh volume accounts are built to handle larger transaction Geoguessr Free volumes, ensuring that businesses can process many payments without issues.
ReplyDeleteEach race in Speed Stars feels like a test of discipline, where perfect pacing and quick reaction times determine whether your runner explodes across the finish line or stumbles behind.
ReplyDeleteLooking for dependable truck services? Venus Truck Repair has you covered with expert Trailer Repair that keeps your rig rolling. We deliver fast, professional, and long-lasting solutions — trusted by truckers who can’t afford downtime. Visit us today and see the difference.
ReplyDelete