Thingsboard is an open-source server-side platform that allows you to monitor and control IoT devices. It is free for both personal and commercial usage and you can deploy it anywhere. If this is your first experience with the platform we recommend to review what-is-thingsboard page and getting-started guide.
This sample application performs collection of temperature and humidity values produced by DHT11 sensor. Collected data is pushed to Thingsboard for storage and visualization. The purpose of this application is to demonstrate Thingsboard data collection API and visualization capabilities.
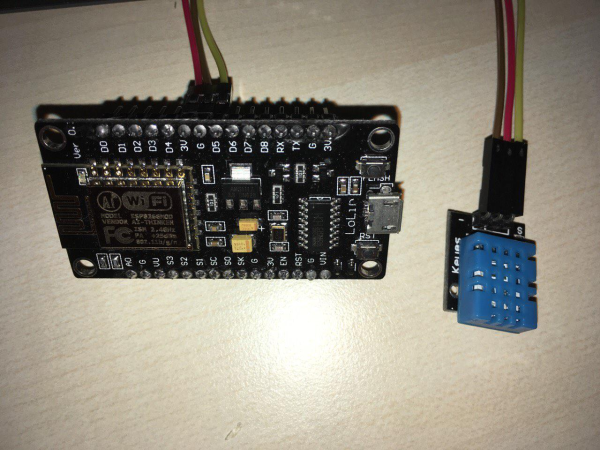
The DHT11 sensor is connected to NodeMCU. NodeMCU push data to Thingsboard server via MQTT protocol. Data is visualized using built-in customizable dashboard. The application that is running on NodeMCU is written using Lua scripting language which is quite simple and easy to understand.
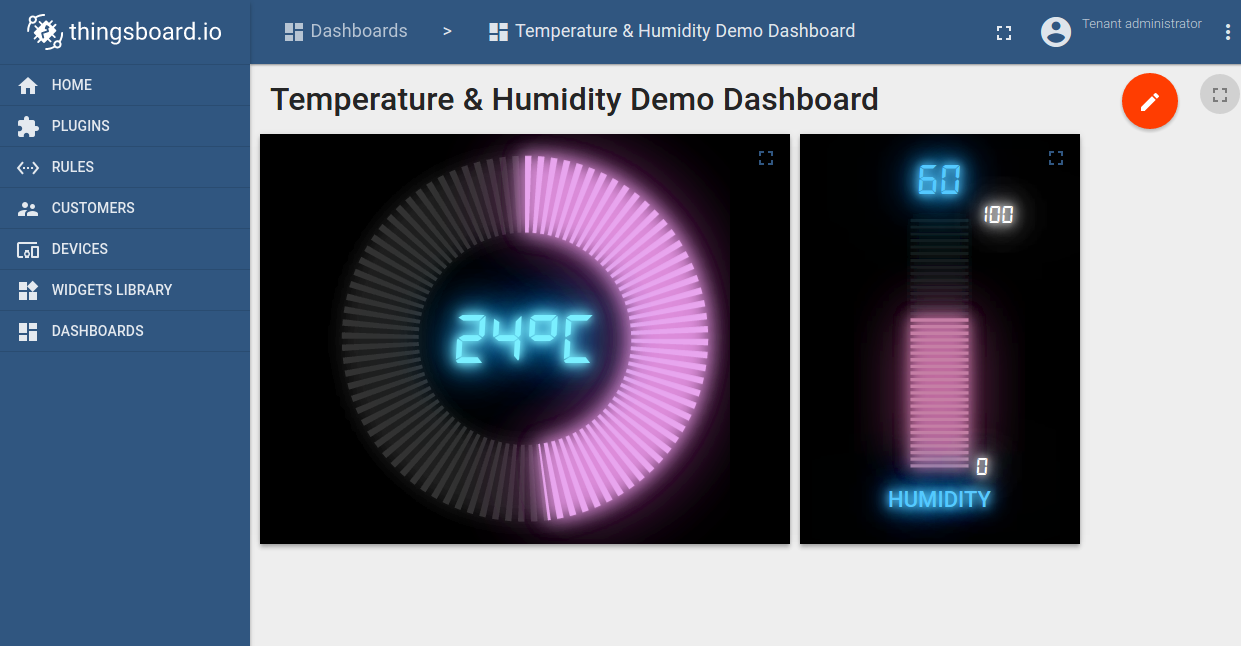
Once you complete this sample/tutorial, you will see your sensor data on the following dashboard.
Prerequisites
You will need to Thingsboard server up and running. Use either Live Demo or Installation Guide to install Thingsboard.
List of hardware and pinouts
- NodeMCU V3 - You can find list of additional documentation in NodeMCU overview

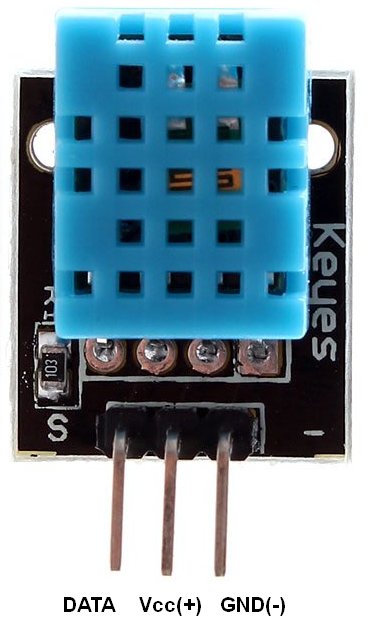
- Keyes DHT-11 - DHT11 sensor with built-in resistor.
- 3 female-to-female jumper wires
Wiring schema
| NodeMCU Pin | DHT-11 Pin |
|---|---|
| NodeMCU 3.3V | DHT-11 VCC |
| NodeMCU GND | DHT-11 GND (-) |
| NodeMCU D5 | DHT-11 Data (S) |
Programming the NodeMCU device
We need to download and build firmware with Lua interpreter for NodeMCU. This process is described in official documentation and there are multiple way to do this. You can use cloud build service for this purpose, however, we will use Docker Image.
Firmware download
Use following commands to clone official github repository for NodeMCU firmware.
$ mkdir -p ~/samples/nodemcu
$ cd ~/samples/nodemcu
$ git clone https://github.com/nodemcu/nodemcu-firmware.git
There is ability to customize firmware by changing two files:
- ~/samples/nodemcu/nodemcu-firmware/app/include/user_config.h - There is an ability to change default baud rate in.
Please find and update line below to specify custom baud rate.
...
#define BIT_RATE_DEFAULT BIT_RATE_115200
...
- ~/samples/nodemcu/nodemcu-firmware/app/include/user_modules.h - Contains list of what kind of modules included by default.
In our case all necessary modules included by default. However, please check that these modules are uncommented.
...
define LUA_USE_MODULES_DHT
...
define LUA_USE_MODULES_MQTT
...
Building firmware using Docker
The easiest way to build nodemcu firmware is by using prepared docker container for that task.
Please visit docker installation page and install docker on your machine.
After installation you need to download docker image from docker hub by command:
$ sudo docker pull marcelstoer/nodemcu-build
Eventually build the firmware by next command:
$ sudo docker run --rm -ti -v ~/samples/nodemcu/nodemcu-firmware:/opt/nodemcu-firmware marcelstoer/nodemcu-build
As the result binary firmware located in the ~/samples/nodemcu/nodemcu-firmware/bin folder.
Application source code
Our application consists of three .lua files:
- config.lua - configuration file, where we define custom configuration.
You need to modify this file in order to setup your wifi network parameters and address of Thingsboard server.
- your wifi network SSID - name of the wifi network.
- your wifi network password - password to the network.
- thingsboard server ip - host where your thingsboard installation. Use “demo.thingsboard.io” if you are using live demo server.
- thingsboard mqtt port - 1883 is the default value.
- thingsboard access token - DHT11_DEMO_TOKEN is the default value that corresponds to pre-provisioned demo account.
If you are using live demo server - get the access token for pre-provisioned “DHT11 Demo Device”.
- dht11.lua - sending temperature and humidity every 10 seconds to thingsboard server via MQTT protocol.
- init.lua - initalization file that contains config.lua:
resources/config.lua |
|---|
|
Flashing the firmware
Before flashing firmware we need to figure out what serial interface using to communicate with NodeMCU.
$ dmesg
...
[845270.901509] usb 3-3: ch341-uart converter now attached to ttyUSB0
...
In our case /dev/ttyUSB0 is used for communication.
In order to flash firmware for NodeMCU, please download and install following utilities
Upload nodemcu firmware using command:
$ sudo ./esptool.py -b 115200 write_flash --flash_mode dio --flash_size 32m 0x0 ~~/samples/nodemcu/nodemcu-firmware/bin/nodemcu_integer_master_*.bin --verify
Upload application files using following commands:
$ sudo ./luatool.py --port /dev/ttyUSB0 -b 115200 --src config.lua --dest config.lua -v
$ sudo ./luatool.py --port /dev/ttyUSB0 -b 115200 --src dht11.lua --dest dht11.lua -v
$ sudo ./luatool.py --port /dev/ttyUSB0 -b 115200 --src init.lua --dest init.lua -v
Troubleshooting
Sometimes you can observe frequent blinking of the blue led after firmware upload. This is probably related to missing initialization data. Use following command to fix this:
$ sudo ./esptool.py -b 115200 write_flash --flash_mode dio --flash_size 32m 0x3fc000 ~/samples/nodemcu/nodemcu-firmware/bin/esp_init_data_default.bin --verify
Sometimes you are not able to upload lua files. Try to reset device and executing command again within first 10 seconds after reset. If no success, try to delete init.lua code from NodeMCU:
$ sudo ./luatool.py --port /dev/ttyUSB0 -b 115200 --delete init.lua
Data visualization
In order to simplify this guide we have included “Temperature & Humidity Demo Dashboard” to the demo data that is available in each Thingsboard installation. Of course, you can modify this dashboard: tune, add, delete widgets, etc. You can access this dashboard by logging in as a tenant administrator. Use
- login: [email protected]
- password: tenant
in case of local Thingsboard installation.
Once logged in, open Dashboards->Temperature & Humidity Demo Dashboard page. You should observe demo dashboard with live data from your device (similar to dashboard image in the introduction).
Next steps
Browse other samples or explore guides related to main Thingsboard features:
- Device attributes - how to use device attributes.
- Telemetry data collection - how to collect telemetry data.
- Using RPC capabilities - how to send commands to/from devices.
- Rule Engine - how to use rule engine to analyze data from devices.
- Data Visualization - how to visualize collected data.
Prepare yourself to take your wardrobe for an overhaul without breaking the bank because of a wonderful piece of information – it is time to know about cider coupon code! It does not matter whether you fancy classic elegance, current fads, and casual chic. Check your chosen brand’s website, subscribe to its email newsletter, or keep abreast with its social media posts for these exclusive stylish offers by your favorite ladies’ wear manufacturers. Affordable high quality fashions are just few button presses. Pass on, your fashion discoveries, coupon/promo codes, and style notes to the community, and let’s help/empower each other to look fabulous for cheaper, better, and faster! Therefore, why don’t you do something
ReplyDeleteYour ability to connect seemingly disparate elements within this theme is a true testament to your creative genius, resulting in geometry dash a comprehensive and holistic understanding that enriches the reader's perspective.
DeleteI rely on BetGuru 365 for their comprehensive and honest assessments of betting sites. Their detailed reviews, available at https://betguru365.com/ , provide an unparalleled depth of analysis. They meticulously examine each site’s offerings, from odds and markets to security measures. This dedication to providing accurate and trustworthy reviews makes BetGuru 365 an essential tool for anyone interested in online betting.
ReplyDeleteUploading temperature via MQTT using NodeMCU and DHT11 sensors has greatly improved access speed. eggy car
ReplyDeleteThe technology of their numbers is amazing Head Soccer
ReplyDeleteTo upload temperature data over MQTT Bou's Revenge using a NodeMCU and a DHT11 sensor, you'll need to set up your hardware and software properly.
ReplyDeleteThank you so much sharing article you always sharing very informative article which help new students thank you so much.
ReplyDeleteFree Coupon Codes & Discounts
Purchasing a GPS tracker is mostly done for real-time tracking. Different tracking devices have different real-time GPS tracking capabilities. doodle baseball
ReplyDeleteThe significant improvement in access speed via MQTT using NodeMCU and DHT11 sensors has greatly improved access speed. geometry dash
ReplyDeleteReal-time monitoring and effective IoT communication are made possible by uploading temperature data over MQTT with a NodeMCU and a DHT11 sensor. This configuration offers a dependable means of sending environmental data to distant servers for control and analysis. I’m currently working on my master dissertation and I am really starting to feel the pressure. I have been think about whether I should buy master dissertation help to ensure everything is perfect. Has anyone here tried this? Was it helpful for your dissertation process? All I want to do is make sure I am receiving what I need without missing any vital. If anyone has used this before, please let me learn how it was and if you believe it is worth the cost.
ReplyDeleteWhether you’re a casual gamer or a hardcore music enthusiast, Sprunked offers something truly special. Let’s dive into what makes this game a must-play.
ReplyDeleteThe tunes can be altered to Fiddlebops suit any mood and are lovely. My obsession is making new music.
ReplyDeleteThe graphics in Escape Road are stunning! The vibrant city streets and detailed vehicles create an immersive environment. It feels like I'm really in a high-speed chase, trying to outsmart the police. Each turn is filled with excitement!
ReplyDeleteA perfect blend of challenge and fun. Explore our Geometry Dash comprehensive guide and become a master of the game.
ReplyDeleteMinimalist Tap Road design but effective. It’s simple, yet the black background and neon accents give the game a sleek, modern feel.
ReplyDeleteIn World Guesser the street view data is quite detailed. Guessing is so much more enjoyable when I can almost sense the local vibe of each place.
ReplyDeleteThe ability to modify terrain Melon Playground weather, and character behavior adds depth to the gameplay, making every session unique and exciting.
ReplyDeleteCrafted for those who value durability and timeless design, this premium material delivers both style and substance. Whether you’re updating your wardrobe or enhancing your accessories, Zing leather offers the perfect blend of luxury and resilience. Discover the difference that true craftsmanship makes in every stitch and detail.
ReplyDeleteWhat do you think would happen if the sensor was off by just 1 second? In geometry arrow , even one wrong tap would cost you the game. Are you accurate enough?
ReplyDeleteGet top-tier car care at Kwik Kar Auto Dallas, your trusted destination for reliable auto repair and maintenance services. From oil changes and brake repairs to engine diagnostics and state inspections, our certified mechanics ensure your vehicle stays road-ready and running smoothly. Experience fast, friendly, and professional service tailored to your needs—right here in Dallas!
ReplyDeleteSpot-on guide for IoT headaches. Long hours parsing streams demand layers that don’t distract. Fresh colors like mint combat screen burnout beautifully. My analytics uniform? The Fear of God Essentials Mint Leaf Hoodie. Unrestricted movement meets mental clarity. Data never felt this cozy.
ReplyDeleteMonitoring temperature with NodeMCU and Thingsboard is fascinating! It reminds me of the thrill of navigating icy slopes in Snow Rider 3D. This project offers a practical way to learn about IoT, similar to mastering those challenging Snow Rider 3D levels. Gathering data via DHT11 and visualizing it is a valuable skill. This setup provides a hands-on experience for anyone curious about IoT and data collection.
ReplyDeletePrecision in data, much like in fashion design, relies on quality inputs and clear presentation to create meaningful impact. That same commitment to excellence and thoughtful construction can be found in pieces designed to perform beautifully in any context. Your technical walkthrough reminds me of how the Catherine Vincent Brooks Jacket combines meticulous detail with versatile elegance.
ReplyDeleteThe more I think about it, the erome more impressed I am with how smooth this whole video was.
ReplyDeleteThis is pretty cool! Seems like a straightforward guide to get temperature data flowing into ThingsBoard. I might actually give this a try for my next IoT project. Thanks for sharing! Do you want to play a lot of fun games on one website? Then come and click me at Playpharos
ReplyDeleteCool tutorial! I'm definitely gonna try this out with my NodeMCU and DHT11. Sounds like a fun little project to get data up to Thingsboard. Thanks for the clear instructions! Classify AI text from major AI models, from ChatGPT to Gemini, Llama, Claude and more.at GPTDetect.ai
ReplyDeleteThis is a cool tutorial! I've been wanting to try ThingsBoard for a while now. The step-by-step guide with NodeMCU and DHT11 seems like a great way to get started. I'll definitely give it a try! It can help you use the image-to-image function, the text-to-image function, or remove the background of your image.at Picool.ai
ReplyDeleteWow, this ThingsBoard tutorial looks super useful! I've been wanting to try connecting sensors to IoT platforms, and this seems like a great, step-by-step guide. Definitely gonna give it a shot! Generate a random email address for you on the web page, fast and convenient at Tempmailpro
ReplyDeleteThis is a cool tutorial! I'm excited to try connecting my DHT11 to Thingsboard. The steps seem pretty straightforward, and the docker image is a lifesaver. Hopefully, I can get my data visualized quickly! Do you want to use AI to write poems, do you want to write a poem for your loved ones, lovers and friends, then come quicklyAI Poem Generator
ReplyDeleteCool tutorial! Looks like a great way to get started with IoT and Thingsboard. I'm definitely going to try this out with my NodeMCU. Thanks for the clear instructions! If you want to use AI tools, there are plenty of good AI tools out there Novatools
ReplyDeleteThis looks like a really helpful guide for connecting sensors to ThingsBoard! I'm gonna try this out with my NodeMCU and see if I can get it working. Fingers crossed! Seems pretty straightforward. If you want to relax, we recommend it Wackyflip
ReplyDeleteWow, this is a cool tutorial for connecting sensors to Thingsboard! Definitely gonna try this out with my NodeMCU. Hope it's as easy as it looks! If you like to play games, don't miss it Mergefellas
ReplyDeleteCool tutorial! I've been looking for a simple way to get sensor data into ThingsBoard. This looks pretty straightforward. I'm gonna give it a try this weekend! Thanks for sharing! If you have date calculation requirements, or want to use the countdown function, welcome to Date Calculator Pro
ReplyDeleteWow, this ThingsBoard tutorial looks super helpful! I've been wanting to try connecting my NodeMCU to a proper IoT platform. Definitely gonna give this a shot over the weekend! Thanks for sharing! If you want to play the fun Candy Clicker game, then come and experience it, and bring you a unique clicker journey Candy Clicker
ReplyDeleteThis is a really neat tutorial! Looks like a fun project to try out with my NodeMCU. The steps seem pretty clear, I might give it a shot this weekend. Thanks for sharing! Do you want to experience a brand new life? Do you want to start from scratch? Choose the life you want? Then come here and play. Bitlife Unblocked
ReplyDeleteCool tutorial! Seems like a pretty straightforward way to get temperature data into ThingsBoard. I might give this a try with my own NodeMCU project. Thanks for sharing!Do you feel that your actual age does not match your mental age, and want to test your mental age, then come quickly? Heart Age Calculator
ReplyDeleteWow, this Thingsboard tutorial looks super helpful! Gonna try this out with my NodeMCU and DHT11. Hope I can get my temperature data showing up on that dashboard! Fingers crossed! Want to play a fun duck life game, there are many fun duck life to experience here Duck Life 3
ReplyDeleteWow, this looks like a super helpful tutorial for getting started with ThingsBoard! I've been wanting to play around with IoT stuff, and this seems like a really straightforward way to do it. Definitely gonna give it a try! Want to generate a triangular prophecy diagram, Deltarune prophecy generator can do it for you, come here to try it.Deltarune prophecy generator
ReplyDeleteCool tutorial! I've been looking for a simple way to integrate DHT11 with ThingsBoard. This looks pretty straightforward, I'll definitely give it a try. Thanks for sharing!
ReplyDeleteIf you want to play a new way to play Roblox, come and experience it here Steal Brainrot Online
This is a cool tutorial! I'm always looking for ways to connect my sensors to the cloud. ThingsBoard looks like a pretty powerful platform, might give it a try! Thanks for sharing! Want to use the latest AI image editing and want to make your images look better, then come and experience Qwen Image Edit
ReplyDeleteThis is pretty cool! I've been looking for a simple tutorial on connecting sensors to ThingsBoard. The docker build method seems really helpful. Gonna give this a try this weekend! Want to split your pictures and make your pictures look better, come and experience it in Img Splitter
ReplyDeleteCool! This is exactly what I was looking for. A clear and simple guide on how to connect DHT11 to Thingsboard using NodeMCU. I can finally monitor my room temperature remotely. Thanks! Do you want to play the original Roblox character click, want to release your stress, then come to A Shedletsky povto experience it
ReplyDeleteThis looks pretty cool! I've been meaning to try Thingsboard for a while now. This tutorial seems like a good starting point to get some sensor data visualized quickly. I'm gonna give it a try! Do you want to keep a pet, do various things with it? Then come and play in Take Care Of Shadow Milk!
ReplyDeleteThis is a cool tutorial! Seems like a great way to get started with IoT and ThingsBoard. I'm gonna try this out with my own DHT11 sensor. Thanks for sharing! Want to use AI to generate images or make your images look better, come and try Image to Image!
ReplyDeleteWow, this is a cool tutorial! I've been wanting to try ThingsBoard with NodeMCU for a while. Looks pretty straightforward, gonna give it a shot this weekend! Thanks for sharing! Race Against Time in a Thrilling Escape at Escape Road
ReplyDeleteWow, this is a pretty cool tutorial! I've been looking for something like this to get started with ThingsBoard. Definitely gonna give it a try this weekend. Thanks for sharing! Looking for a variety of different liquid glass effects, you can find a variety of different liquid glass effects to use in Liquid Glass HQ
ReplyDeleteWant to play Bloodmoney, which has been very popular lately, here you can play the latest Blood Money 2
ReplyDeleteCool tutorial! I've been looking for a good guide on connecting DHT11 to Thingsboard. This seems pretty straightforward, I'm gonna give it a try! Thanks for sharing! Do you want to convert your fonts into all kinds of weird shapes, and want to make your fonts look better, then come and try Freaky Font Generator
ReplyDeleteWow, this looks like a super useful tutorial for anyone playing around with IoT! I'm gonna try this out with my NodeMCU and see if I can get it working. Thanks for sharing! Want to play a fun point-and-click game experience with a wonderful story, then come and experience it in Lovemoney
ReplyDeleteCool! This is a great tutorial for connecting IoT devices to ThingsBoard. Easy to follow steps even for beginners. Might give it a try myself! Seems like a fun project to build. If you want to play a fun and relaxing clicker game, come and experience it in 67 Clicker
ReplyDeleteCool tutorial! Seems like a fun project to try out. Might give this a shot this weekend. Thanks for sharing! I've been looking for something like this to get started with ThingsBoard. Want to play a fun test game to test whether you are a robot or not, come and experience it in Im Not A Robot Game
ReplyDeleteThis is a really cool tutorial! I've been looking for a simple way to connect my DHT11 to ThingsBoard. Seems pretty straightforward, might give it a try this weekend! Thanks for sharing! Want to describe your picture, or are you still worried about not knowing how to describe a picture, come to Image Describer to try it.
ReplyDeleteWow, this tutorial looks really helpful for anyone starting with IoT projects! I love how detailed it is with the NodeMCU and DHT11 setup. Definitely gonna try this out this weekend! If you want to play the new Retro Bowl experience, try it out in Retro Bowl 26.
ReplyDeleteThis is a cool tutorial! I've been looking for a good guide on using ThingsBoard with NodeMCU. This looks pretty straightforward, gonna try it out this weekend. Hope it works! Looking for fun puzzle games? Constantly embark on adventures to solve mysteries, right here at Dead Plate
ReplyDeleteSimple yet deeply meaningful, the God Is Everywhere Hoodie turns everyday wear into a spiritual reminder. Its sleek design and cozy fit make it ideal for anyone who values comfort with a purpose. Slip it on and embrace a message of guidance, strength, and unwavering presence wherever life leads you.
ReplyDeleteI appreciate the thoughtful details in the Christmas Chronicles 2 Mrs. Claus Coat It’s crafted in a way that feels luxurious without being overdone. The coat has a graceful silhouette that flatters all body types, making it one of the best holiday-inspired pieces I’ve come across.
ReplyDeleteIt’s nice when a website makes browsing stylish clothing feel effortless. Vanson Jackets consistently features designs that add something refreshing to any closet. One of the most striking items is the
ReplyDeleteMarty Supreme Orange Jacket, which stands out for its color and premium appeal.
I know It will very beneficial for me kobe Bryant Hoodie
ReplyDeleteHope more people will read this article keep up the good work This Article is Awesome. It’s help me a lot. Please keep up your good work. We are always with you and Waiting for your new interesting articles Zach Bryan Hoodie
ReplyDeleteThis is a really decent site post. Not very numerous individuals would really, the way you simply did. I am truly inspired that there is such a great amount of data about this subject have been revealed and you've put worth a valiant effort with so much class. XXXTentacion Jacket
ReplyDeleteThis open-source IoT platform overview highlights the importance of robust data management. For teams needing a creative break from complex systems, consider [steal a brainrot free](https://stealthebrainrot.org/). It's a chaotic multiplayer game that offers a fun, mental reset. Such creative diversions can surprisingly boost productivity when returning to technical projects.
ReplyDelete